Should you need any additional support, please send an email to support@2-controlware.com
In your mail, please mention
- the version of your NAV/Microsoft Dynamics 365 Business Central environment
- if possible any screenshot and/or error message you received
- in which connection the problem/error occurred when you have multiple databases.
We strive to answer within 48 hours after receipt of your request.
When you would like to send in tickets through our servicedesk portal, please send an email to support@2-controlware.com requesting access and an activation mail will be sent.
Latest News can be found on our home page
¶ Connection issues
¶ Additional setup when using a proxy for outbound traffic
When you are using a proxy for your outbound traffic, you have to add some lines into the config file of the Multi Connector.
This file can be found on the server where the Multi Connector services have been installed, which default path is C:\Program Files (x86)\2-Control B.V\Authorization Box Multi Connector.
Lines to be added :
<system.net>
<defaultProxy>
<proxy usesystemdefault = "false" proxyaddress="http://address:port" bypassonlocal="false"/>
</defaultProxy>
</system.net>
¶ Additional setup when using oAuth OnPrem authentication
When you are using oAuth OnPrem authentication, it is necessary to set the ADOpenIdMetadataLocation parameter for version 22 and later in the server instance. (see https://learn.microsoft.com/en-us/dynamics365/business-central/dev-itpro/administration/authenticating-users-with-azure-ad-openid-connect?tabs=singletenant%2Cadmintool)
¶ Connection error with Dynamics using OAuth OnPrem
Error message was : “Fout bij verbinden met Dynamics - De inloggegevens zijn onjuist of de gekozen authenticatiemethode komt niet overeen met die van uw servicetier (Windows, NAVUserPassword of Microsoft Entra Application). Probeer de url van de webservice te openen in een andere browser of pas de instelling aan naar de juiste authenticatiemethode en probeer het nogmaals. Bij gebruik van de Microsoft Entra Application authenticatie: Maak gebruik van de toegangssleutel voor webservice als wachtwoord voor de ingestelde gebruiker. Deze kan aangemaakt worden vanaf de gebruikerskaart in Dynamics 365 Business Central.”
("Error connecting to Dynamics - The credentials are incorrect or the chosen authentication method does not match that of your service tier (Windows, NAVUserPassword, or Microsoft Entra Application). Try opening the URL of the web service in a different browser or adjust the setting to the correct authentication method and try again. When using the Microsoft Entra Application authentication: Use the web service access key as the password for the set user. This can be created from the user card in Dynamics 365 Business Central.")
The things that have to be checked are :
- has the Grant Consent been given in Microsoft Dynamics 365 Business Central?
- is the Scope correct?
- is the URL for connection correct?
- Is the User which is used for the connection a SUPER user and hasn't this password been expired? (a much used option is to use a service administrator account)
- is the field of the Authentication E-mail of the User which is used to make the connection with the Authorization Box filled in correctly? (in case this is empty, fill it in)
- is there really only one Multi Connector installed on the server? You can check this by checking the overview of the services. The Authorization Box Multi Connector and Authorization Box Multi Connector updater should be visible only once)
¶ Refresh token error message
In some occasions the token for the connection between the Authorization Box and Microsoft Dynamics 365 Business Central needs to be refreshed. (normally this is performed automatically by the Authorization Box)
A small error message mentioning this will then be shown in red on top of your screen when checking your database connection.
In this case, you can refresh this token by going to the database connection in Setup => General.
Usually this means that the OAuth refresh token has expired (this token is required for the connection).
This can be restored by going to the Settings => General => Databases. There you choose the database connection regarding this message.
Go through the Oauth setup process again https://wiki.2-controlware.com/AB-Getting_Started#authentication-with-oauth.
Make sure the person that is going through this process is a user with SUPER permissions in Business Central.
¶ Connection error message regarding Multi Connector and port 443
To troubleshoot the connection to the Authorization Box, the following steps can be followed.
These steps have to be performed on the server where the Authorization Box Multi Connector is installed. Base for this troubleshooting is the Microsoft manual : Troubleshooting guide for Azure Service Bus - Azure Service Bus | Microsoft Docs
- Browse to https://box-sb-prod.servicebus.windows.net/ this should result into an XML
- Test the following ports (powershell):
- tnc box-sb-prod.servicebus.windows.net -port 9351
- tnc box-sb-prod.servicebus.windows.net -port 9352
- tnc box-sb-prod.servicebus.windows.net -port 443
- In some cases also 9350, 5671, 9354
All tests should run successfully. If not, then there is some Firewall setup blocking the necessary traffic. (e.g. outbound HTTPS traffic through port 443, see point 6)
3. Is the Windows service for the Authorization Box Multi Connector started on the server
4. Is the Windows service for the Authorization Box Multi Connector updater started on the server
5. Does the configuration file of the Authorization Box Multi Connector have the correct security code/key? You can check this to go the folder where the Multi Connector has been installed (standard is C:\Program Files (x86)\2-Control B.V\Authorization Box Multi Connector) and check in the file AuthorizationBox.MultiConnector.exe.config the value in the field CustomerSecurityCode. This field should be the same as the Security Key you use in the connection of the Authorization Box.
6. Check the outbound requirements. You need to open the Azure Relay port settings as described in the following article https://docs.microsoft.com/en-us/azure/azure-relay/relay-port-settings#wcf-relays. This article includes a table that describes the required configuration for port values for Azure Relay.docs.microsoft.com.
7. Check if the connection has not been changed (e.g. into proxy)
¶ Connection error message regarding Multi Connector and port 443 using Oauth
When the Multi Connector services have been installed on a new environment , it is possible this message still appears when trying to make connection, even though all the steps have been gone through correctly and the services seem to be running.
A restart of the server with this new environment, where the Multi Connector was newly installed, will solve the connection problem.
¶ Connector connection not available / disabled connection database
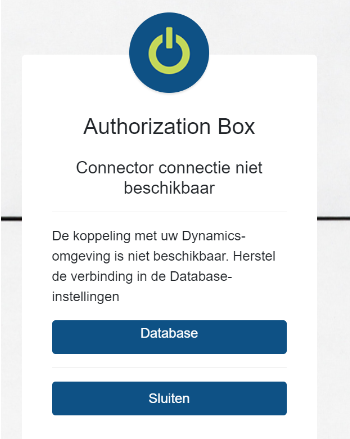
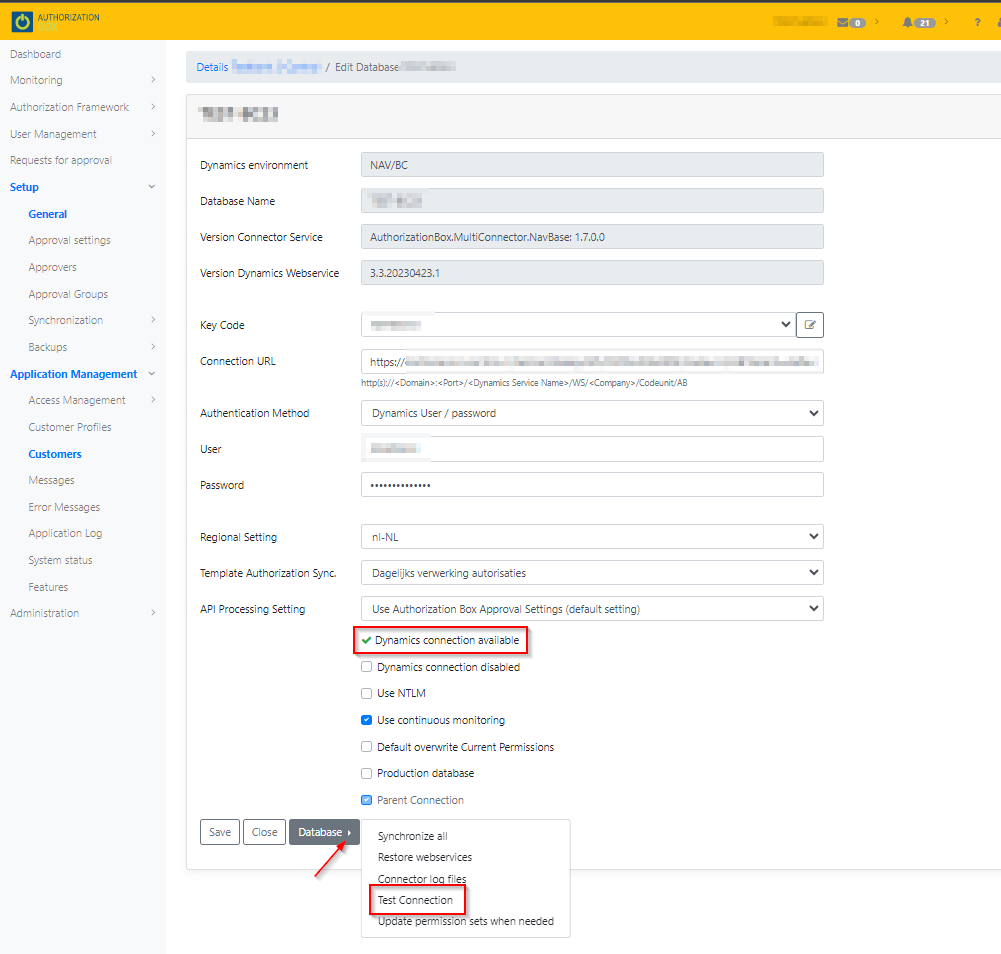
Go to the database connection in Setup => General.
Click on the database of which the connection was lost.
Click on the button ‘Database’ at the bottom of the page.
Click on ‘Test Connection'.
When the connection has been re-established successfully, this message will show up in green on the top of the page and a green check mark will appear on the checkbox “Dynamics connection available”
¶ Permissions issues
¶ No menu visible
When a new user has been added as an Authorization Box user, there is no database connection selected with their first log-in.
As a result, no full menu is visible.
To solve this, the user has to go to the Settings by clicking on their username in the op right corner and select a database connection. Save this setting and the full menu will become visible.
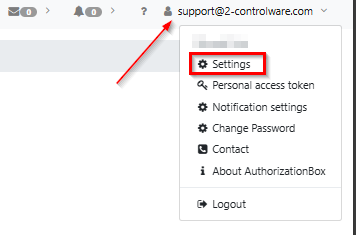

It now is also possible to switch between database connections with the database icon.

¶ No permission for authorizations per company / group
When this message occurs, you probably have not been assigned this permission on that connection.
To solve this, you have to go to that database connection (Setup=>General→fasttab Databases→pencil icon behind that database connection) and move the company you want to have authorizations on from the right column to the left column.
¶ Permission Error on Permission Set
When an error message arises in the Permission Sets which are User-Defined, you can manually add the missing permission to a Permission Set.
It is important that you know which table (Object Name) is mentioned in the error message and you need to know which permissions you want to add/edit (Read, Insert, Modify, Delete or Execute)
Go to Business Central and search for Permission Sets. Open the Permission Set which is missing a permission.
Click on the ‘Pencil’ on the top of the page to edit the set. In Objecttype choose “Table Data”. In Object-id choose the required table to which you want to give permissions.
Modify the permission(s) in the permissions columns.
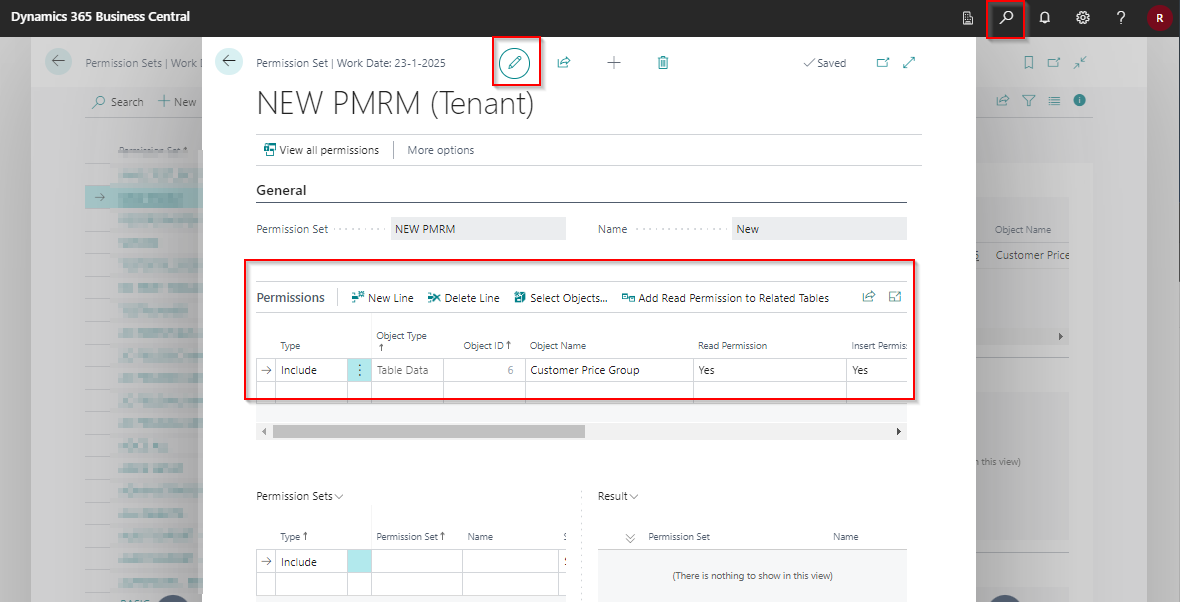
As Business Central saves automatically you can now leave that screen and the Permission Set has been amended.
Note that this can only be performed on User-Defined Permission Sets and not on System Permission Sets.
¶ Synchronization issues
¶ Synchronization shows error due to a faulty query
When a synchronization task has gone into error because of a query, you can find out what went wrong with which query.
In the User card where this error message was applicable for, go to the fasttab “Processed Actions”.
Under this fasttab go to the time the synchronization task went into error and find the query which went wrong.
There is a short description in the column “Error Text” why the query wasn't executed. Clicking on the ‘magnifying glass’ will show a pop-up of that query regarding the fields and the values found for those fields.
¶ Scheduled Full monitoring synchronization task doesn't run
When your scheduled synchronization task doesn't run, because an error occurred during the synchronization, you should manually start a synchronization task.
Click on the ‘Execute’ button behind the task.
As long as such a task hasn't run successfully or unsuccessfully, a new one can/will not be started.
In case this task has not been executed within 24 hours, please contact our helpdesk to stop this synchronization run.

¶ My changes made in an Approval template are not visible in Business Central
When changes which were made in an Approval template are not visible in Business Central, you should manually sync the users who have been assigned the role(s) with that approval template.
After the (successful) synchronization, the changes made in the Approval template should also be visible in Business Central.
¶ Users issues
¶ Error message when opening User overview
When opening the overview of Users, an error message can prevent opening the page.
9 out of 10 the cause is that the connection in the Authorization Box was made for the first time and opening that page is the first action taken. In that case, the User Cache probably wasn't finished with it's task when trying to open the User overview page.
In that case, the User cache should be activated manually through the menu option Setup => Data caches.
¶ New user added in Business Central not visible
When you added a new user in Business Central and this user is not visible in the Authorization Box, you should probably refresh the User cache.
Go to Authorization Framework => User Management => Users and click there on the ‘Refresh’ button in the top right corner.
¶ Unwanted activation of users for the Authorization Box
Business Central users can be (unintentionally) activated in the Authorization Box :
- by making an Authorization request for that user (by clicking on the ‘+ sign’ of that user or through User management=>Authorization request),
- or when you use “Import Userdata” through the Organization Chart.
When you use “Import Userdata” through the Organization Chart, you have to make sure you have removed the user(s) you do not (yet) want to activate in the Authorization Box, from the excel document you use to import the data.
By omitting the removal of those users from the import file, you will inadvertently activate those users in the Authorization Box too.
Once a user has been activated for the Authorization Box, this cannot be undone.
When you use the option “Default overwrite Current Permissions” for your database connection, this often is not desired for these users. You can find how to deactivate this option here.
¶ Can not access Users after import Back-up
When you have imported a Back-up because you want to set up a new environment which is a (perhaps amended) copy of an older version, you also need to import the (perhaps also amended) data on the users with the import options through the Organization Chart ("Import Permission Sets per Organization Role", "Import Users per Organization Role") after you made an “Export Structure” of the older version.
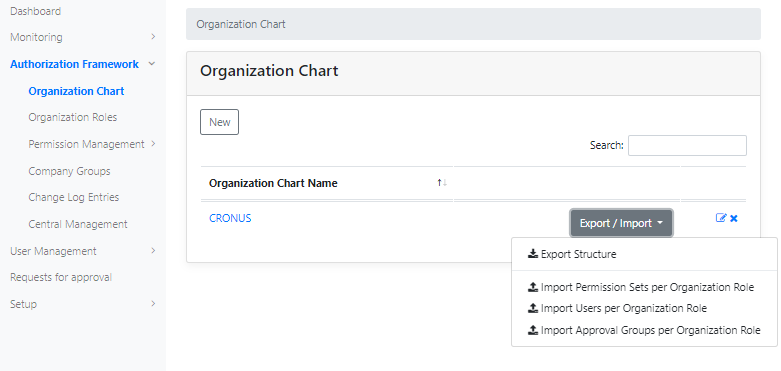
!Note : When you use “Import Userdata” through the Organization Chart, you have to make sure you have removed the user(s) you do not (yet) want to activate in the Authorization Box, from the excel document you use to import the data.
By omitting the removal of those users from the import file, you will inadvertently activate those users in the Authorization Box too.
Once a user has been activated for the Authorization Box, this cannot be undone.
When you use the option “Default overwrite Current Permissions” for your database connection, this often is not desired for these users. You can find how to deactivate this option here.
¶ Can log in, but receive message that I am not authorized
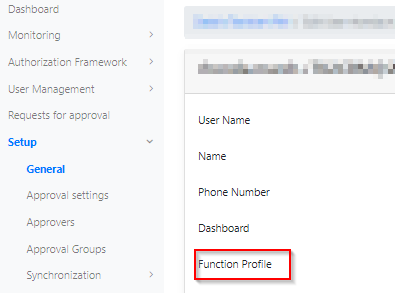
You need to check that, when your Authorization Box user has been added, the Function Profile has not been assigned to your user.
¶ Adding a new user and using templates
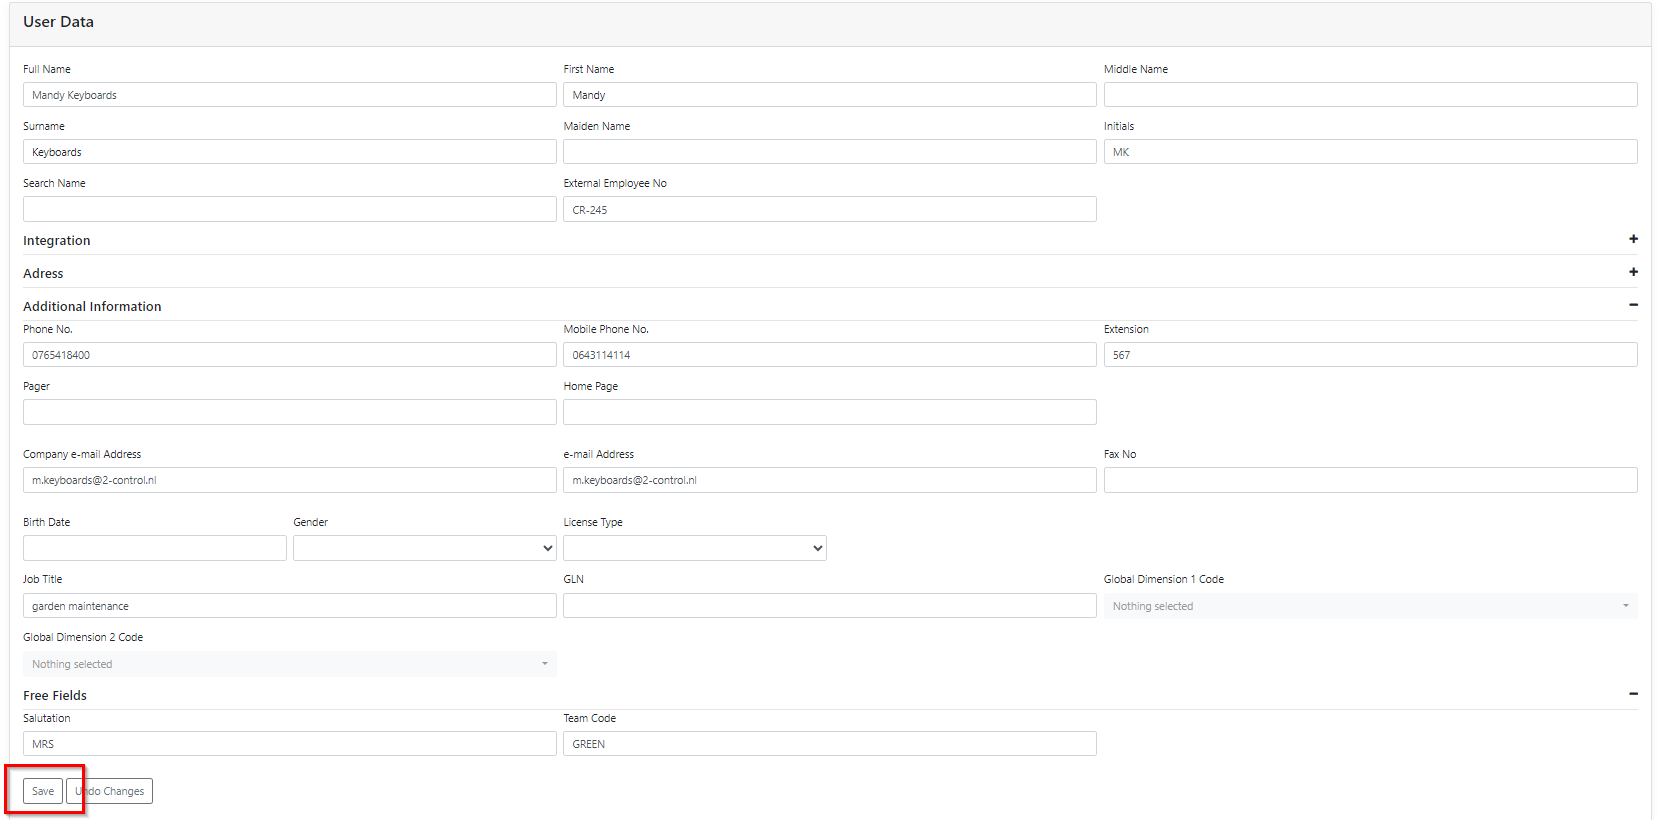
It is important that, when you use templates and you want to add a new user (and their organization roles), you make sure that the required information for the templates are also filled in.
Most of this information required for the output of the templates, are to be filled in under the fasttab “User Data”.
When the information has been filled in, it is important that you ‘Save’ it first before you go further with the processing of the request.
Examples of fields that are used regularly are, Full Name, First name, Last name, Initials, External employee number, Phone number(s), e-mail addresses, Job Title, Free fields (e.g. used for Team codes, Salutations)
¶ Migrating Authorizations
During the implementation of the Authorization Box more environments are used.
Building Permission Sets and testing is normally done in a test environment.
Acceptance in the accept environment and go live with the production environment.
It is possible to migrate the Authorizations and setup to a different environment. This involves Business Central and the Authorization Box database connection.
To migrate the authorizations and the setup, you can follow the steps below.
The steps describe a migration from a test environment to the production environment.
¶ Go to the Business Central Test environment where the new Permission Sets are build
Create a RapidStart package for the Permission Sets and Permissions in Business Central (with Configuration Packages) and export this package.
Use the standard RapidStart package for the Field Validation and Field Security setup.
¶ Go to the Authorization Box (connection with Test database)
Backup the test environment through Setup => Backups => Export and select what you want to export.
Go to Authorization Framework => Organization Chart and Export the structure for the “Permission Sets per Organization Role” and “Users per Organization Role”.
All users should have the correct permissions in the test environment.
¶ Go to the Business Central Production environment
Import the RapidStart packages and check the number series. If they do not exist yet, you will have to make them.
¶ Go to the Authorization Box (connection with Production database)
Import the backup made from the test environment through Setup => Backups => Import.
Import the Organization Role and Users per Organization Role through the export/import button on the Organization Structure.
¶ Checks after migration
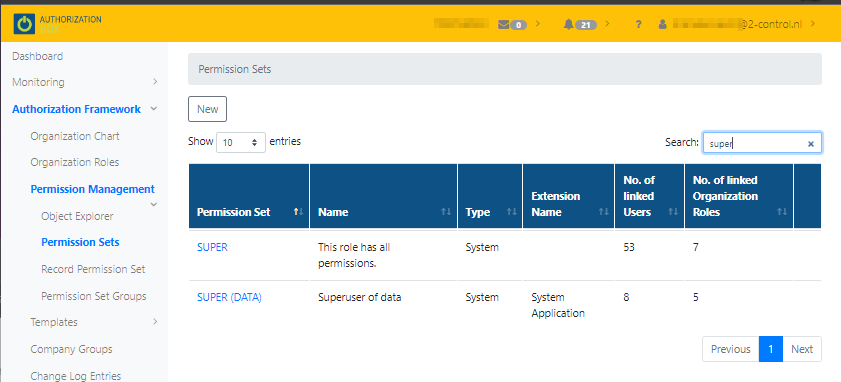
- Check which accounts have SUPER rights through Authorization Framework => Permission Management => Permission Sets and search SUPER.
Open the SUPER permission set to review the linked Users and linked Organization Roles.
- Check whether all users exist in the Authorization Box through User Management => Users , column “Exists only in Dynamics”.

- Check some users in the Business Central database.
- Check the authorizations on company.
- Check whether all Mandatory fields and the Field and Dataset securities are active (start date in the past and no end date).
- Check the User Personalization (RTC profile and client language), User setup (authorization, posting from/to, etc.) and Warehouse Employees where applicable.
¶ Frequently Asked Questions
¶ Why SUPER permissions required for the connection user
The connection user which is set in the Authorization Box is required to have SUPER permissions, as this ‘user’ has to be able to assign rights in the database.
¶ Where can I find what changes have been made by 2-Controlware to the Authorization Box
You can find the changes made to the Authorization Box in the release notes in this wiki.
¶ Is there an overview of which Organization roles and Permission sets are assigned to the users
You can make an export of the Organization Structure (Authorization Framework => Organization Chart) in which the Organization roles with their Permission sets can be found and the users with the Organization roles assigned to them.
Should you want to know which objects and their rights are assigned to the Permission Sets, go to the Permission Sets in Business Central, choose the set(s) you want to have this overview of and choose for Export permission sets. Save the XML file and you can open it with Excel to get a simple overview of the objects per permission set.
¶ Default overwrite Current Permissions to be deactivated for a user
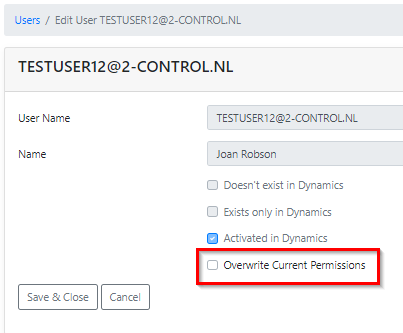
If you want to deactivate the option “Default overwrite Current Permissions” for a specific user, you have to do this in User Management=>Users.
In the overview you have to click on the pencil icon at the end of the line mentioning that user.
In the screen that opens, you can uncheck the checkbox for the “Default overwrite Current Permissions” for this user.
This user will no longer be part of the nightly synchronization check.
¶ Do I need separate key codes for my database connections?
It is only necessary to use separate key codes per connection when the databases are network-technically separated from each other and your primary connector cannot reach all environments.
In this case, multiple Multi Connector Services can be installed (one per environment), each having their own unique key code.
If your primary connector can reach all environments, it is not necessary to use multiple connectors, however if you want to explicitly separate production from test it is allowed.
Please note that also in that scenario, you will need a new unique key code. If you want to use multiple key codes, you can request those by sending a mail to support@2-controlware.com.
¶ Where can I find the webservice for the setup of a database in the Authorization Box
The webservice required to setup a database connection in the Authorization Box can be found in Business Central.
When you have logged in to the database, you have to search for Web service.
In the overview, find the Objecttype “Codeunit”, Object-id “70077770” with Object name “2C ES ABWebService” and Servicename “AB”. This line will also mention the SOAP URL which has to be used in the connection settings in the Authorization Box.
¶ No Permission Sets visible in the Analysis Results of a Critical Permission
When no Permission Sets are shown in the Analysis results of a Critical permission, but you see Permission Sets when you want to review a User or Organization Role, a possible reason could be that in the setup of the Critical Permission, the “Has to comply to” is set to “All objects” or in the Objects assigned to that Critical Permission the “and/or RIMDX” is set to “and” in stead of “or”.
¶ Default general settings is set to No approvers, but still approval is required
When your default general settings is set to “No approvers” and you want to make changes to an Organization role or have an Authorization request that has to do with Organization roles, it is possible you still need approval to process the changes.
The reason would be that an Organization role has been assigned to an Approval Group or a “number of approvers” has been set in that Organization role.
These settings overrule the general setting of “No approvers”.
.png)
.png)
¶ How to copy the data from a connection into a new connection
You can copy the data from a connection into a new connection, but the history from the “old” connection will (can) not be copied. (analysis results)
The steps to follow to copy the data are as follows :
- In the original connection, go to Setup=>Backups=>Export.
- Check al the boxes of the options you want to export to the new connection.
- Click on 'Export' and save the excel document.
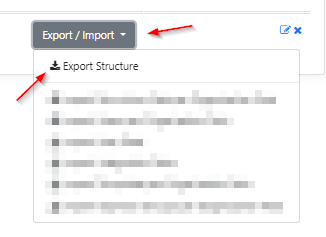
- Go to Authorization Framework=>Organization Chart and click on 'Export/Import'.
- Click on 'Export Structure'.
- Save the excel document.
- In the new connection, go to Setup=>Backups=>Import.
- Check al the boxes of the options you want to import into the new connection.
- With 'Browse' choose the back-up excel document you saved from the original connection.
- Click on 'Import'.
- Go to Authorization Framework=>Organization Chart.
- Choose what data you wish to import.
- With 'Browse' choose the organization structure excel document you saved from the original connection.
- Click on 'Import'.
- Repeat steps 11 - 14 for every option you would like to import (depends on your license which options you can choose from).
Please bare in mind that the Backup import option does not remove or change any existing data. It can only add data.
Sequence of importing the data through the Organization structure :
- Import permission sets per organization role
- Import templates per organization role (if applicable)
- Import user data
- Import integration data
- Import users per organization role
¶ User caching
¶ I can't find the User for an Authorization request
When you want to add an organization role to a new user, but that user is not visible in the drop down box of the Authorization request, it could be that you changed something to that user, or it is a brand new one.
To fix this, you should renew the cache for the Users.
Go to Authorization Framework => User Management => Users and click there on the ‘Refresh’ button in the top right corner. After the “refresh” you should also refresh your window.
¶ Why is the “No. of linked Users” on the Permission Sets overview not correct
The “No. of linked users” on the Permission Sets page can be incorrect if there have been made changes to a User or a new User has been made in Business Central after the last cache refresh.
To fix this, you should renew the cache with the ‘Refresh’ button on the top right corner of the Users page. After the “refresh” you should also refresh your window.
¶ Why is the “No. of linked Permission Sets” on the Users overview not correct
The “No. of linked Permission Sets” on the Users page can be incorrect if there have been permission set (role) assignments or revokes after the last cache refresh.
To fix this, you should renew the cache with the ‘Refresh’ button on the top right corner of the Users page. After the “refresh” you should also refresh your window.
¶ Permission Sets caching
¶ I can’t find the Permission Set which I want to add to an Organization role
When you want to add a permission set to an organization role, but that set is not visible, it could be that you changed something to that permission set, or it is a brand new one.
To fix this, you should renew the cache for the permission sets.
Go to Authorization Framework => Permission Management => Permission Sets and click there on the ‘Refresh’ button in the top right corner. After the “refresh” you should also refresh your window.
¶ Why is the “No. of linked Users” on the Permission Sets overview not correct
The "No. of linked users" on the Permission Sets page can be incorrect if there have been permission set (role) assignments or revokes after the last cache refresh.
To fix this, you should renew the cache with the ‘Refresh’ button on the top right corner of the Permission Sets page. After the “refresh” you should also refresh your window.
¶ Why is the “No. of linked Permission Sets” on the Users overview not correct
The "No. of linked Permission Sets" on the Users page can be incorrect if there have been permission set (role) assignments or revokes after the last cache refresh.
To fix this, you renew the cache with the ‘Refresh’ button on the top right corner of the Permission Sets page. After the “refresh” you should also refresh your window.
¶ Lockout and mandatory change of password
Every 90 days an Authorization Box user is required to change the password.
When a user has tried to log on with an invalid password 5 times, the user will be locked out. A new password has to be requested to/by the Application manager. An email with a temporary password will be sent to the locked out user.
This password has to be changed on first login.
¶ Is it possible for 2-Controlware employees to make changes to the logging of the changes in the Authorization Box
No, logging can not be changed by 2-Controlware employees.
¶ Where is the data being hosted and when is a back-up being made of this data
2-Controlware can deliver a SOC2 report where an overview of the type of data is mentioned and here you can find more information about the databases we maintain.
¶ Who has access from 2-Controlware to the environment of customers within the 2-Controlware environment
Members of the 2-Controlware support team can access the Authorization Box environment of a customer and will only do so if necessary for support or training purposes. If a 2-Controlware user is active in your environment you can see this in user management under general setup. 2-Controlware access to a customer environment is automatically removed within 24 hours.
¶ What are the password complexity requirements for the Authorization Box
The password has to be at least 12 characters and consisting of at least one number, a capital letter and a punctuation mark.
¶ Is there an overview of all the changes made to the Authorization Box within the environment of the customer (Business Central)
The Authorization Box is a generic SAAS application. It is not a specific customer application environment. In the processed authorization requests and the synchronization log, it is visible which changes by the Authorization Box have been made in the database environment. (Business Central) More authorization changes can be consulted in the change log entries of Business Central.
¶ Synchronization task Management data in error
It is possible that the synchronization task for the Management data keeps going in error.
This task is meant to be able to choose a user from the Active Directory when you want to make an authorization request for this user and this user does not exist in the Authorization Box yet. When this task is not / can not be performed, the alternative would be to create this Active Directory user in Business Central, after which this user will be visible in the Authorization Box and can be picked from a list when creating an authorization request for that particular user.