¶ Basics
Authorization Monitoring is a self-audit tool that helps management to be ‘in control’ of the authorizations in Microsoft Dynamics 365 Business Central and Microsoft Dynamics 365 for Finance and Operations.
Authorization Monitoring provides insight into the quality of the Authorization Framework and Setup. Through the analysis of Critical Permissions, flaws in Permission Sets, Organization Roles and User Authorizations can be detected. The analysis results will show where Data Ownership and Segregation of Duties (SoD) in the Authorization Framework and Setup is established and where it is lacking.
Authorizations are set up to a concept whereby employees / organization roles are responsible for certain data in Business Central.
In addition, the authorizations ensure the segregation of duties in the organization.
Default Business Central has no functionality to analyze the quality of the authorizations. This means organizations have no instrument to control their setup.
Using the Monitoring module, the quality of the permissions assigned can be evaluated by asking questions, defined as Critical Permissions.
Critical Permissions might be grouped in processes for ease of analysis.
Furthermore, accepted risks might be excluded from analysis.
Conflicts are defined as a combination of Critical Permissions to be avoided for segregation of duties.
A video about Authorization Monitoring can be found on our YouTube channel.
¶ Setup Authorization Monitoring
¶ Processes
For documentation and processing purposes of the Critical Permissions, Processes can be defined as a subdivision on Critical Permissions. (e.g. Sales, Finance, Purchasing, Warehousing)
Go to Monitoring => Settings => Processes and click on ‘New’.
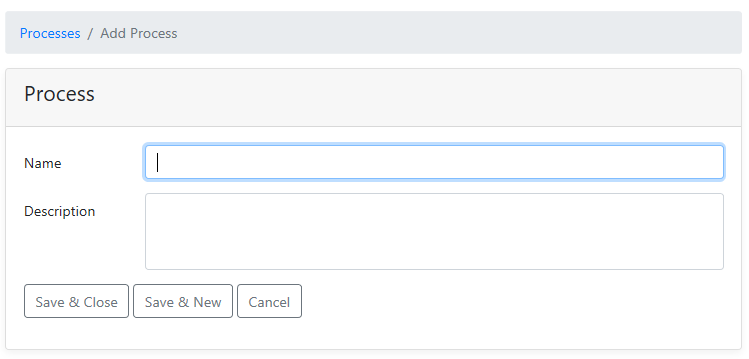
- Name : Short name for the Process.
- Description : More detailed description of the Process.
‘Save & Close’ : Saves the Process and closes the page.
‘Save & New’ : Saves the Process and clears the fields.
'Cancel' : Cancels adding the new Process and closes the page.
¶ Categories
For documentation and processing purposes of the Critical Permissions, Categories can be defined as a subdivision of the Processes assigned to the Critical Permissions. (e.g. Prospect, Ledger, Vendor, Shipping)
Go to Monitoring => Settings => Categories and click on 'New'.
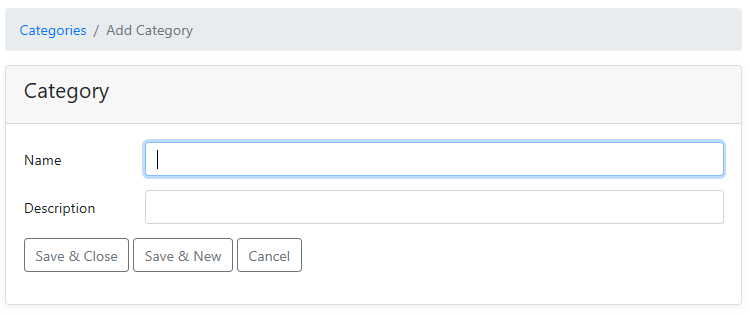
- Name : Short name for the Category.
- Description : More detailed description of the Category.
‘Save & Close’ : Saves the Category and closes the page.
‘Save & New’ : Saves the Category and clears the fields.
‘Cancel' : Cancels adding the new Category and closes the page.
¶ Excluded Permission Sets
If the organization formally accepts risks, permission sets may be excluded from analysis.
The permission set SUPER is an example which always results in a risk, because users with this role can modify all data in the system. If this role is included in the analysis, every analyzed permission would result in an actual risk, which leads to a complex analysis.
This is why permission sets like SUPER can be / are excluded from analysis.
If required, include any excluded permission set in the analysis by selecting the option “Analysis with excluded permission sets” in the Critical Permission.
Go to Monitoring => Settings => Excluded Permission Sets and click on ‘New’ to choose a Permission Set which has to be excluded.
It is possible to select several Permission Sets at once to exclude, by selecting multiple Sets. A check mark will be visible behind the chosen Sets.
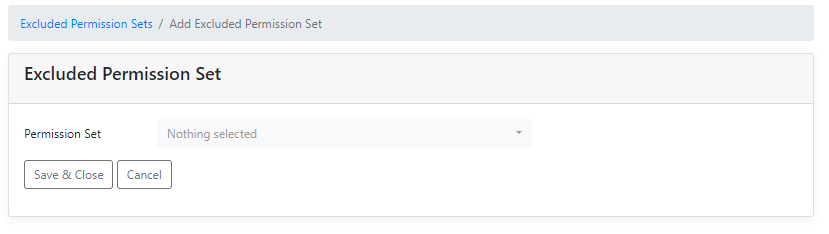
'Save & Close' : Saves the exclusion of the chosen Permission Set(s) and closes the page.
'Cancel' : Cancels the exclusion of the chosen Permission Set(s) and closes the page.
¶ Critical Permissions
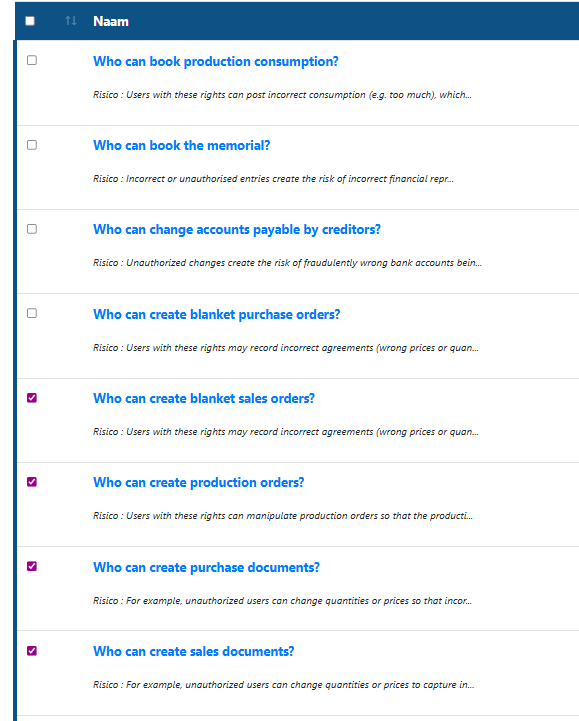
A Critical Permission is a research question to ask Authorization Box.
For example:
- Who is able to modify items?
- Who can create a payment proposal?
- Who is able to perform other tasks? (e.g. post invoices, modify setup, etc.)
To set up a Critical Permission, configure three parts:
- The Critical Permission header.
- Objects (Permissions) to analyze for.
- Allowed Organization Roles for this Critical Permission.
¶ Set up a Critical Permission
Go to Monitoring => Critical Permissions . Click on ‘New’ to create a Critical Permission.
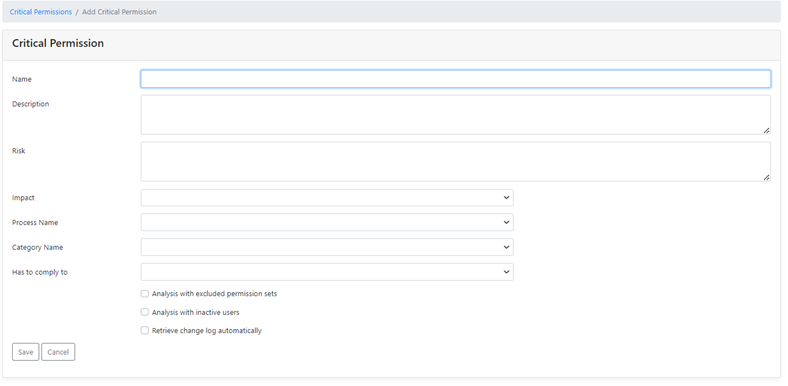
The header holds information for documentation and processing purposes:
- Name : The (short) name of the Critical Permission.
- Description : More detailed information of the Critical Permission.
- Risk : Which risk does assigning of the Critical Permission pose?
- Impact : What is the impact of misuse of the Critical Permission; high, medium or low?
- Process Name : Select the process of the Critical Permission.
- Category Name : Select the Category in which the Critical Permission falls.
- Has to comply to :
- All objects : Select this option if all defined permissions for all defined objects are required to get a result.
All of the defined permissions need to be assigned to the user.
For example: to post a document, a user needs permissions to both the table data posted header and posted line: Purch. Inv. Header and Purch. Inv. Line (irrespective of the permission set through which these are assigned). Microsoft Dynamics 365 Business Central blocks posting if the user is missing any of these, so it makes sense to analyze for assignment of this combination. - One object : Select this option if just one linked object has to be found in the analysis to get a result.
Any of the permissions for any of the objects defined makes the user, organization role or permission set to which the permission is assigned, appear in the results.
This is often used for analyzing permissions to master data and setup information. (for example table data accounting period, several posting groups and dimensions.)
- All objects : Select this option if all defined permissions for all defined objects are required to get a result.
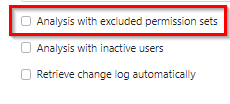
- Analysis with excluded permission sets : Select this option to include the ‘Excluded Permission Set(s)’ in the analysis of this Critical Permission.
- Analysis with inactive users : When the box is not checked (default option), inactive users are to be excluded from the analysis.
- Retrieve change log automatically : Select this option to have the system show records from the change log of Business Central for this Critical Permission.
'Save' : Links the objects which have to be analyzed and expands the page with the fasttabs Objects, Allowed Organization Roles, Conflicting Permissions and Subscribers Continuous Monitoring.
'Cancel' : Cancels the addition of the new Critical Permission and closes the page.
¶ Linking Objects to a Critical Permission
To link one or more Objects to the Critical Permission to analyze, follow these steps:
Open the Critical Permission and click 'Edit' or,

in case of a new Critical Permission go to the fasttab “Objects”.
¶ Fasttab Objects
Click on 'New' to set up the permission to analyze:
.png)
- Type : Select the object type.
- Id : Select the object to analyze. The object can be found by typing the id or name of the object.
- Name : Will be filled in automatically after the Id was selected.
- And/Or RIMD : Select the option "And” if the Read, Insert, Modify and Delete permission should be exactly the same as defined.
Select the option “Or” if just one of the object permissions should be found in the analyses. - Execute : Visible when an other option than Tabledata has been chosen.
'Save & Close' : Saves the object(s) and settings to the Critical Permission and closes the page.
'Save & New' : Saves linking the object(s) to the Critical Permission and clears the fields to add a new object to link.
¶ Allowed Organization Roles for a Critical Permission
Link “Allowed Organization Roles” to set up which permissions are allowed by default, according the authorization design / authorization framework :
- In the “Edit” mode of the Critical Permission, or
- In the process of a new Critical Permission in the fasttab “Allowed Organization Roles”.
In the analysis results the system will mark these results (Organization Roles and linked Permission sets) as Agreed Configuration.
¶ Fasttab Allowed Organization Roles
Click on 'New' to link an Organization Role.
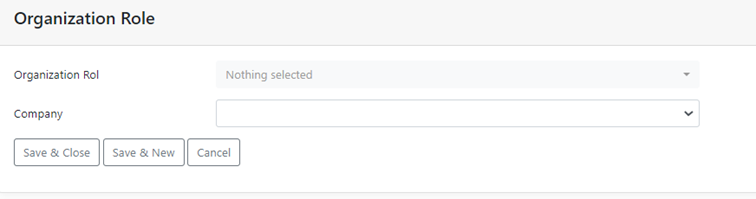
- Organization Role : Select the organization role which should be included as being allowed (has to be an organization role which doesn't pose a risk). You can select multiple organization roles at once.
- Company : Select the company in which the Organization Role is allowed. If left blank, the selected organization roles will be allowed in all companies.
'Save & Close' : Saves the allowed organization role to the Critical Permission and closes the page.
'Save & New' : Saves the allowed organization role and clears the fields to add another Organization Role to be allowed to the Critical Permission.
‘Cancel’ : Cancels the addition of the organization role and closes the page.
¶ No. of Change Log Entries
In case this has been activated for the applicable objects in Business Central, this column shows the number of change log entries retrieved from Business Central.

After using the button ‘Calculate Change Log’, this column will show the number of changes, made by that user on objects in that Critical Permission.
To see the logged changes , open that result with the ‘eye-icon’, and click on the number, mentioned in the “No. of Change Log Entries” column.

To automatically retrieve the change log entries, the box “Retrieve change log automatically” has to be checked.
¶ Conflicts
Conflicts are defined as a combination of Critical Permissions to be avoided for segregation of duties.
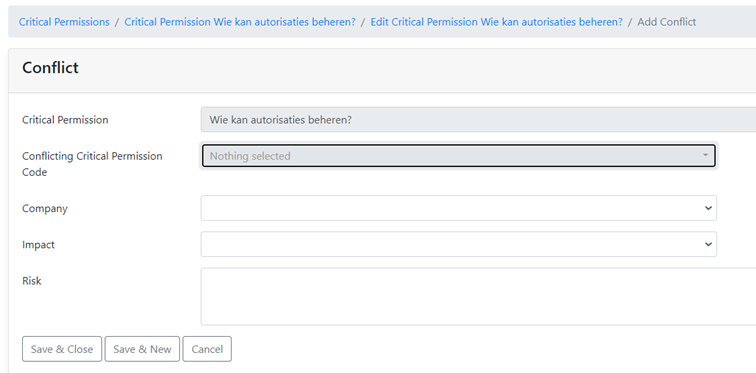
¶ Set up a Conflict (not via a Critical Permission)
Go to Monitoring => Conflicts and click on ‘New’ to create a Conflict.
¶ Adding a Conflict
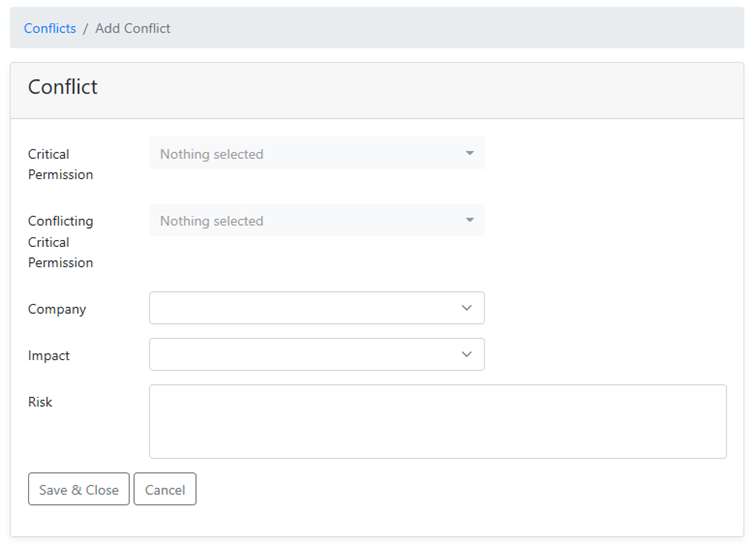
- Critical Permission : Select the Critical Permission to be added to a Conflict.
- Conflicting Critical Permission : Select the Critical Permission which would create a Conflict.
- Company : Optional: Select the company to which this conflict applies.
- Impact : Select the impact of the Conflict. (High, Medium or Low)
- Risk : Describe the risk of the Conflict.
‘Save & Close’ : Saves the new Conflict and closes the page.
‘Cancel’ : Cancels the addition of the new Conflict and closes the page.
¶ Setup a Conflict (via a Critical Permission)
When adding a new Critical Permission, click on the fasttab “Conflicting Permissions” or, in case of an existing Critical Permission, click on 'Edit' and click on the fasttab “Conflicting Permissions”.
¶ Fasttab Conflicting Permissions
Click on 'New'.
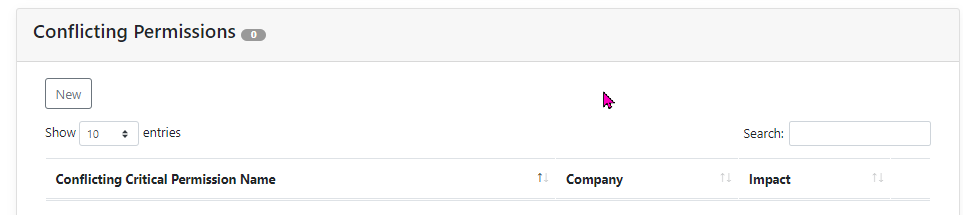
Conflicting Critical Permission Name : Select the Critical Permission which would create a Conflict.
Company : Optional: Select the company to which this Conflict would apply.
Impact : Select the impact of the Conflict. (High, Medium or Low)
Risk : Describe the risk of the Conflict.
‘Save & Close’ : Saves the new Conflict and closes the page.
‘Save & New’ : Saves the new Conflict and clears the fields to add a new Conflict to that Critical Permission.
‘Cancel’ : Cancels the addition of the new Conflict and closes the page.
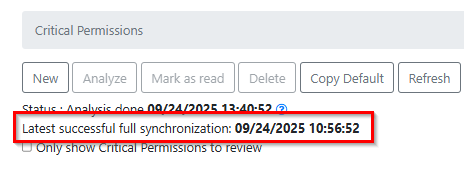
¶ Analyzing results
Before starting an Analysis job, it is important that the Full Synchronization Monitoring task has successfully run recently. (Setup=>Synchronization=>Tasks→Full synchronization monitoring)

If this has not been successfully run recently, analysis will be run with outdated information which would result in incorrect results.
You can find when the last successful full synchronization was performed in the top left corner of the Critical Permissions overview.
In case there are a lot of analysis results, it's an option to first analyze which Organization Roles are allowed and link them to the Critical Permission.
After a new analysis, more results will have the status “Agreed” and less “To review”.
“Agreed” on the Allowed Organization Roles means that based on the setup the result poses no risk.
In case Security Groups are used and to be included in the analysis, this option has to be enabled and consent has to be given. (see below)
¶ Analyze Critical Permissions
To analyze permissions, go to Monitoring => Critical Permissions.
In the overview of the Critical Permissions (Monitoring => Critical Permissions) an analysis of the Critical Permissions can be started by selecting them all (use the checkbox in the blue banner to select them all) or using a selection by using the check boxes.
To analyze only a few specific Critical Permissions, check the boxes in front of those Critical Permissions.
Click on 'Analysis'.
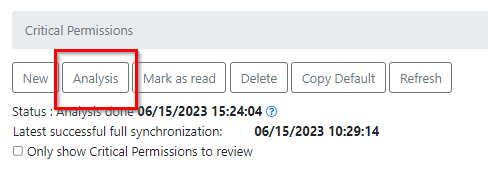
A notification that the analysis has started appears.

During the analysis, check the status by clicking ‘Refresh’ which will change the status from “Analysis sent” to “Analysis in progress” and finally (after an other ‘Refresh’) into “Analysis done”.
If notification setup for analysis results has been set to “Yes”, a notification will be visible and/or a mail will be received when the analysis has been completed.
(How to setup a notification can be found here.)
On the right hand side there are three notification dots.
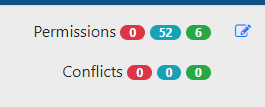
Permissions red dot : Shows the number of results reviewed with “Disagreed”.
Permissions blue dot : Shows the number of results with "To be reviewed".
Permissions green dot : Shows the number of results reviewed with “Agreed”.
Clicking on the specific dot will show the overview of the results with that status.
On the right side of these 3 dots, there is also a pencil icon to edit that particular Critical Permission.
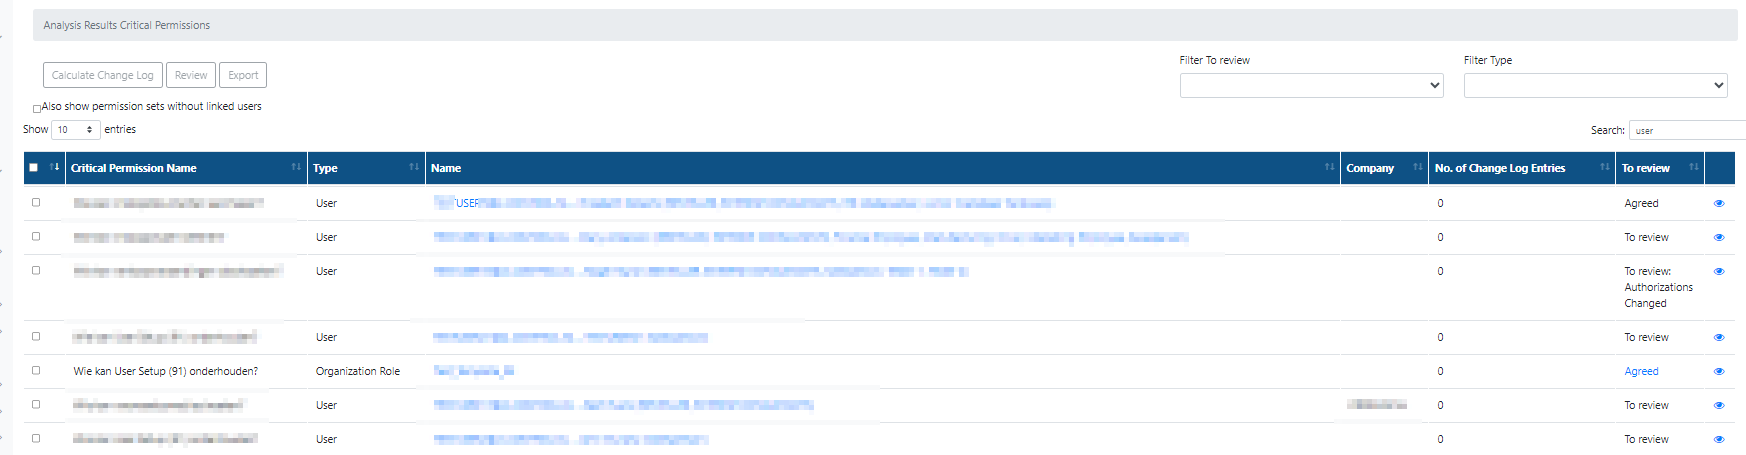
¶ Review the findings for Critical Permissions in the Critical Permission
In the Critical Permission, go to the fasttab “Analysis result Critical Permission”.
Findings can be filtered on 4 options :
- Search
- Filter To review (options are Agreed, Disagreed, To be reviewed, “blank”)
- Filter Type (options are User, Organization Role, Permission Set, “blank”)
- A combination of the above

Search : Enter a (part of a) word and everything with that combination of characters in the Name will be filtered in the overview of the results.
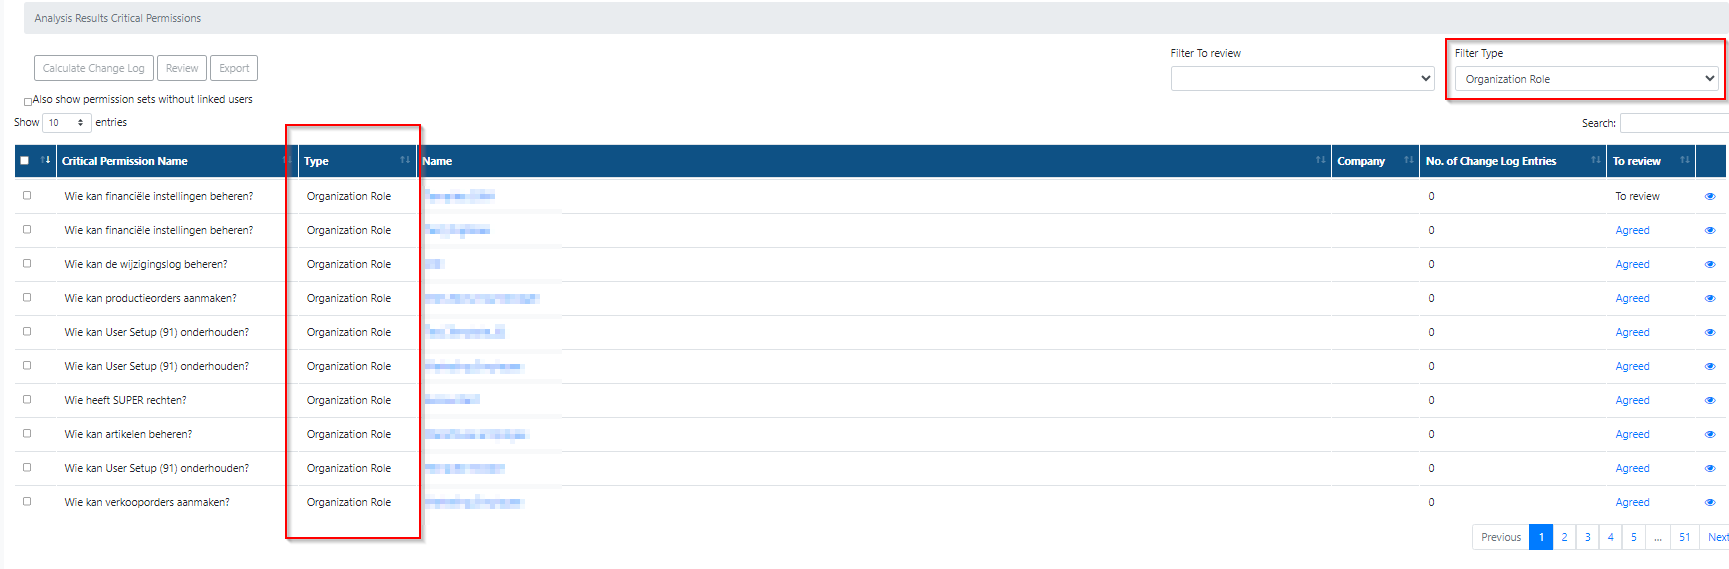
Filter Type : Options to filter on :
- User
- Organization Role
- Permission Set
- ‘blank’ (show all)
Eg. On type Organization Role :
.png)
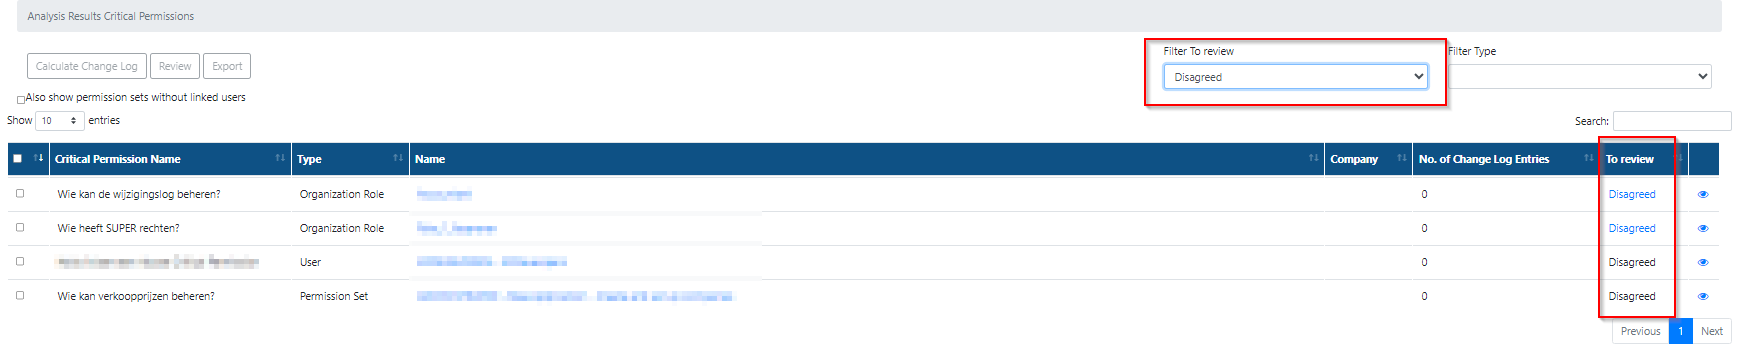
Filter To review : Options to filter on :
- Agreed
- Disagreed
- To review
- ‘blank’ (show all)
Eg. On Disagreed :
.png)
It is also possible to combine the filter types and use the search query.
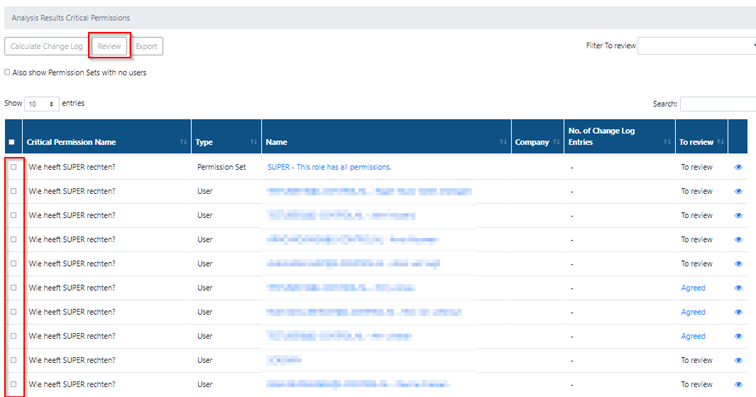
To review a result, click on the ‘Eye’ button next to the Analysis Result.
.png)
Or tick the checkbox in front of the result and click on the button ‘Review’ in the top left corner.
With this last option multiple results can be reviewed at once.
.png)
When reviewing multiple results, the tab ‘Reviews for Analysis Results’ on the Review page shows the selected results to be reviewed.
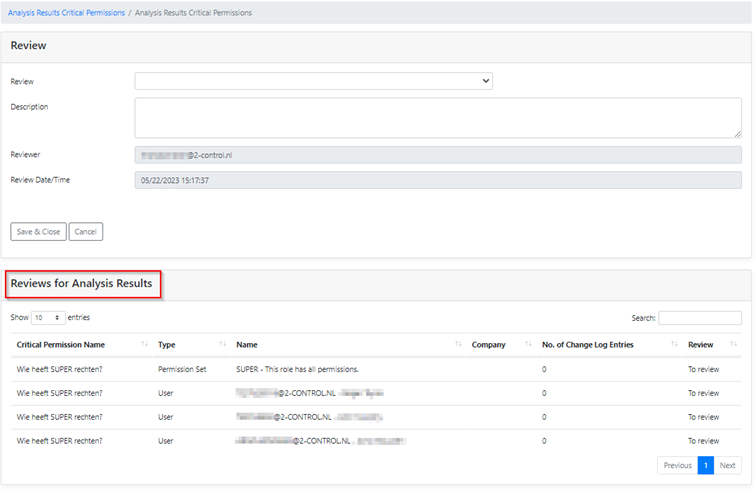
When only one result is chosen to review, the review page will show the specific finding(s) of the Critical Permission.
.png)
- Previous Review: Last review made for this result.
- Review: Select how this result is to be reviewed. To leave only a comment, select the same review status as the previous review.
- Comment: Can be used to substantiate the review.
- Reviewer: The person who entered the review.
- Review date/time: The moment the review was entered.
- No. of Field Securities : Shows the number of active Field Securities matching this result. (when our Compliance Field Security extension is installed, else it will show an E)
- No. of Filtered Securities : Shows the number of active Filter Securities matching this result. (when our Compliance Field Security extension is installed, else it will show an E)
‘Save & Close’ : Saves the review and closes the page.
‘Cancel’ : Cancels the review and closes the page.
To select all Critical permissions at once, check the box in the title row.
.png)
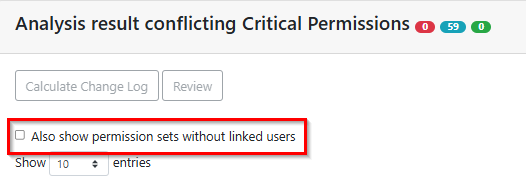
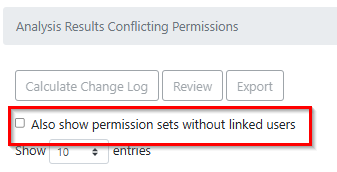
It is possible that it looks like all results have been reviewed, but the number in the blue dot still shows a number of results to be reviewed.
In that case, there are probably results for some permission sets which are not linked to users.
Tick the checkbox with ´Also show permission sets without linked users´ to make those permission sets visible for reviewing.

¶ History of reviews on analysis results Critical Permissions
For the history of the reviews, click on the fasttab ‘Reviews history’ when adding a review to the result.
This fasttab will only be available when reviewing one result. Not when reviewing in bulk. The review made in bulk however, will be visible in the history of the individual result.
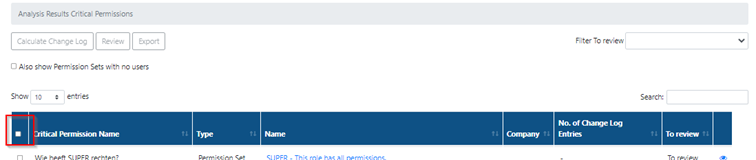
¶ Review the findings for Critical Permissions with menu option “Analysis Results”
Go to Monitoring => Analysis Results => Critical Permissions.
Findings can be filtered on 4 options :
- Search
- Filter To review (options are Agreed, Disagreed, To be reviewed, “blank”)
- Filter Type (options are User, Organization Role, Permission Set, “blank”)
- A combination of the above
Search : Enter a (part of a) word and everything that has that combination in the Critical Permission Name, Type or Name will be filtered.
Eg. Filtering on “user” will show the results with User in the Critical Permission name, type User and User in the Name.
Filter Type : Options to filter on :
- User
- Organization Role
- Permission Set
- ‘blank’ (show all)
Eg. On type Organization Role :
Filter To review : Option to filter on :
- Agreed
- Disagreed
- To review
- ‘blank’ (show all)
Eg. On Disagreed :
It is also possible to combine the filter types and use the search query.
In below example it shows that “ing” is filtered in the Critical Permission Name as well as in the Name (second line) :

Review a single result by clicking on the ‘Eye’ button next to the Analysis Result.
Or by ticking the checkbox in front of the result and using the button ‘Review’ in the left top corner.
This last option is mostly used to Review multiple results at once.
When reviewing multiple results, these are summed up on the bottom of the Review page.
When only one result is chosen to review, the next screen will show the specific finding(s) of the Critical Permission.
- Previous Review: Status based on the last review.
- Review: Select a status for this review. To leave a comment, select the latest review status.
- Comment: Can be used to substantiate your review.
- Reviewer: The person who entered the review.
- Review date/time: The moment the review was entered.
- No. of Field Securities : Shows the number of active Field Securities that match this result. (when our Compliance Field Security extension is installed, else it will show an E)
- No. of Filtered Securities : Shows the number of active Filter Securities that match this result. (when our Compliance Field Security extension is installed, else it will show an E)
‘Save & Close’ : Saves the review and closes the page.
‘Cancel’ : Cancels the review and closes the page.
To select all Critical permissions at once, check the box in the blue banner.
‘Save & Close’ : Saves the review and closes the page.
‘Cancel’ : Cancels the review and closes the page.
!Note : When reviewing an Organization Role, the Users and Permission Sets of that role will automatically also be reviewed.
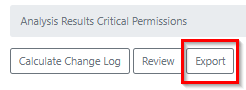
To export the reviews to Excel, select the result(s) with the check box(es) and click on the button 'Export'.
It is possible that it looks like all results have been reviewed, but the number in the blue dot still shows a number of results to be reviewed.
In that case, there are probably results for some permission sets which are not linked to users.
Check the checkbox with ´Also show permission sets without linked users´ to make those visible and review those results.
¶ History of reviews on analysis results Critical Permissions
To check the history of reviews made on the result, click on the Review in the line of the result, or click on the fasttab ‘Reviews history’ when adding a review to the result.
This fasttab will only be available when reviewing one result. Not when reviewing in bulk. The review made in bulk however, will be visible in the history of the individual result.
¶ Analyze Conflicts
The Conflicts can not be analyzed separately.
They will be analyzed at the same time an analysis for the Critical Permissions is run.
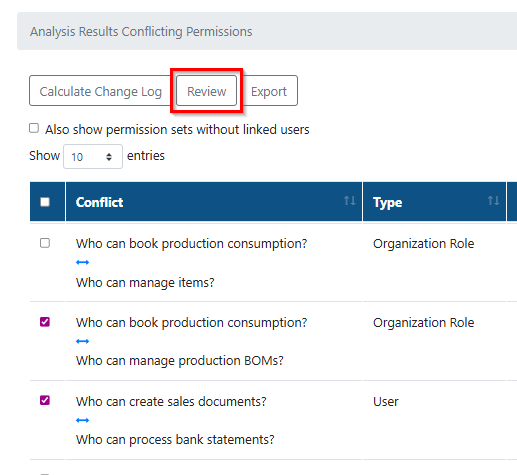
¶ Review the findings for Conflicts in the Critical Permission
In the Critical Permission, go to the fasttab “Analysis result conflicting Critical Permissions”.
The findings can be filtered using 4 options :
- Search
- Filter To review (option for Agreed, Disagreed, To be reviewed, “blank”)
- Filter Type (option for User, Organization Role, Permission Set, “blank”)
- A combination of the above
.png)
Search : Enter a (part of a) word and everything that has that combination in the Name will be filtered.
Filter Type : The option to filter on :
- User
- Organization Role
- Permission Set
- ‘blank’ (show all)
Eg. On type Organization Role :
.png)
Filter To review : Option to filter on :
- Agreed
- Disagreed
- To review
- ‘blank’ (show all)
Eg. On Agreed :
.png)
It is also possible to combine the filter types and use the search query.
A result can be reviewed by clicking on the ‘Eye’ button.
Or by ticking the checkbox and using the button ‘Review’.
.png)
This last option can be used to review multiple results at once.
To select all results at once, check the box in the title row.
When reviewing multiple results, the tab ‘Reviews for Analysis Results’ shows the selected results for this review.
.png)
When only one result is to be reviewed, the review screen will show the specific finding(s) of the Critical Permission.
- Previous Review: Status based on the last review.
- Review: Select a status for this review. To leave a comment, select the latest review status.
- Comment: Can be used to substantiate the review.
- Reviewer: The person who entered the review.
- Review date/time: The moment the review was entered.
- No. of Field Securities : Shows the number of active Field Securities that match this result. (when our Compliance Field Security extension is installed, else it will show an E)
- No. of Filtered Securities : Shows the number of active Filter Securities that match this result. (when our Compliance Field Security extension is installed, else it will show an E)
‘Save & Close’ : Saves the review and closes the page.
‘Cancel’ : Cancels the review and closes the page.
On the right hand side there are three notification dots.
Conflicts red dot : Shows the number of results reviewed with “Disagreed”
Conflicts blue dot : Shows the number of results with "To be reviewed"
Conflicts green dot : Shows the number of results reviewed with “Agreed”
Click on the specific dot to go to the overview of the results from that category.
On the right side of these 3 dots, there is also a pencil icon to edit that Conflict..
It is possible that it looks like all results have been reviewed, but the number in the blue dot still shows a number of results to be reviewed.
In that case, there are probably results for some permission sets which are not linked to users.
Tick the checkbox with ´Also show permission sets without linked users´ to make those visible.
¶ History of reviews on analysis results Conflicting Critical Permissions
To check the history of reviews made on that conflict, click on the fasttab ‘Reviews history’ when adding a review to the analysis result.
This fasttab will only be available when reviewing one result. Not when reviewing in bulk. The review made in bulk however, will be visible in the history of the individual result.
¶ Review the findings for Conflicts with the menu option “Analysis Results”
Go to Monitoring => Analysis Results => Conflicts
The review of the Conflicts can be done in the same way as for Critical Permissions. (“Review the selected finding(s) for Critical Permissions”)
As with the Analysis Results of the Critical Permissions screen, there are 4 options to filter on :
- Search
- Filter To review (option for Agreed, Disagreed, To be reviewed, “blank”)
- Filter Type (option for User, Organization Role, Permission Set, “blank”)
- A combination of the above
Clicking on the Eye button, will open the result.
Or by ticking the checkbox and using the button ‘Review’.
This last option can be used to review multiple results at once.
To select all results at once, check the box in the blue banner.
.png)
To export the reviews to Excel, select the result(s) with the check box(es) and click on the button 'Export'.

It is possible that it looks like all results have been reviewed, but the number in the blue dot still shows a number of results to be reviewed.
In that case, there are probably results for some permission sets which are not linked to users.
Tick the checkbox with ´Also show permission sets without linked users´ to make those visible.
¶ History of reviews on analysis results Conflicting Critical Permissions
Click on the fasttab ‘Reviews history’ when adding a review to the result.
This fasttab will only be available when reviewing one result. Not when reviewing in bulk. The review made in bulk however, will be visible in the history of the individual result.
¶ Evaluate findings of an analysis
Go to Monitoring => Reviews
Shows an overview of the results with status “To review”, “Agreed” or “Disagreed” after an initial analysis.
There is the option to filter from which date on the results have to be visible.
With the right permissions, reviews can be deleted by selecting the results (check box) to be deleted and click on 'Delete'.
Checking the box in the blue banner will select all users at once.
To export the reviews to Excel, select the results by using the check box and click on 'Export'.
¶ Analysis results including Security Groups
When Security Groups, which have been set up in Business Central, are to be part of the analysis results, these should firstly be added to the Full monitoring sync.
To add the Security Groups to the full monitoring sync, this option has to be enabled.
When enabling this option, a consent has to be given to the Authorization Box by a user who is authorized to give consent through Entra to read the permissions in these Groups.
When the option has been enabled, these security groups and their permission sets will also be added and visible in the analyzing results.
To enable this option go to Setup, Synchronization, Tasks. Click on the arrow before the name, which will open the tasks. Under the column of Status, change the switch for Table Id 9020 to ‘on’.

After given consent, run the full synchronization monitoring by clicking the Execute button.
When the synchronization has been successful, a new analysis can be started and when applicable, the security groups will be part of the results too.
¶ Analyse results by Organization Role
A video about the analysis by Organization Role can be found on our YouTube channel.
To review the results by Organization role, go to Monitoring => Organization roles.
On this page the analysis results can be reviewed per organization role. This display is more in line with the way in which the permissions within the Authorization Box can be maintained.
It shows, for each organization role, which users are assigned this organization role and which rights are given through the organization role, based on the set up research questions/the critical privileges.
There are a few filter options available on the organization roles analysis page.
.png)
The first 2 filters, ‘Filter users on company group’ and ‘Filter users on company’ are used to filter the users on basis of the assigned organization role to the user.
The 'Filter users on company group" will only show the organization roles in that particular group.
The ‘Filter users on company’ will show the organization roles in that company, also when that company is part of a company group.
There is the option to filter using 2 checkboxes;
Show only used roles : only used organization roles will be visible.
Show only roles to be reviewed : only organization roles that have not been reviewed will be visible.
¶ The fasttab Critical Permissions
The fasttab Critical Permissions shows all the Critical Permissions where this organization role is part of in the analysis.
To check what exactly it entails, click on the name of a critical permission to open it.
By clicking on the number of permission sets, an overview of the permission sets will pop-up, showing the permissions assigned which are the reason why this organization role is shown as an analysis result for that critical permission.
.png)
.png)
A result can be reviewed quickly by clicking on the checkmark to Agree or ´x´ to Disagree.
.png)
When a review has been chosen, a pop-up will allow additional information to be added.
.png)
To add a review on a critical permission for the first time, the option to cancel the review will also be available.
This option will also be available when the assessment differs from the previous one.
The information can be added afterwards by clicking on the same assessment.
.png)
The pop-up will ask if information would have to be added or if a new review has to be created.
¶ Review of multiple critical permissions.
To review multiple critical permissions at once, check the boxes of the ones that have to be assessed in bulk and click on the ‘Agree’ or ‘Disagree’ button.
.png)
A pop-up will appear to add information regarding the bulk assessment.
.png)
¶ Fasttab Users
The users that have this organization role assigned, are listed here.
Clicking on a user name or name, will open the user card.
.png)
As in the fasttab of the critical permissions, the assigning of the organization role to a user can be assessed by clicking on the checkmark to Agree or ´x´ to Disagree.
Here too a pop-up will appear to add information regarding the review made.
To assess users in bulk, use the checkboxes and add a review by using the ‘Agree’ and ‘Disagree’ button.
¶ History of assessments
A given assessment on a critical permission or user will be visible in the Reviews history.
.png)
When hovering over the Reviews history icon, only the latest review with additional information will appear.
Clicking on the icon will show a pop-up with the history of all the assessments with the additional information given, who made the assessment and when it was made.
¶ Filtering
As well as in the fasttab of the critical permissions as in the fasttab of the users, the option is available to filter the overview on review status ‘Agreed’, ‘Disagreed’ or ‘to review’.
Depending on the chosen filter (like e.g. Agreed), only the analysis results with the status of the chosen filter will be visible. Without a filter, all the analysis results will be visible.
Using the Search option will help you find certain entries easier, like for instance all the critical permissions mentioning sales.
.png)
A video showing 'Monitoring through Organization Roles' can be found on our YouTube channel.