¶ Basics
The Authorization Box authorizes users in Dynamics 365 Business Central per database through an Organization Chart.
The Organization Chart, consists of Departments and Organization Roles.
Organization Roles have Permission Sets assigned.
Users are assigned to one or multiple Organization Roles through Authorization Requests.
We have a video on our YouTube channel showing how to create and maintain an authorization framework by using an organization chart.
Changes in the Organization Chart will result in Approval Requests.
Check out our YouTube channel, to find a short video regarding authorization requests, .
¶ Create an Organization Structure
Go to Authorization Framework => Organization Chart and click on the button 'New'.
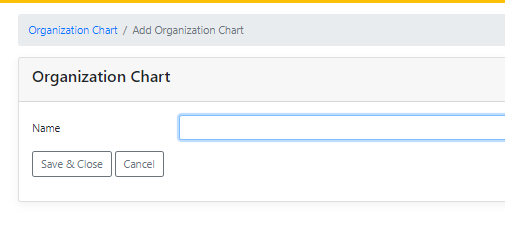
Enter a name for the Organization Chart.
Optionial multiple Organization Charts can be created for multiple purposes.
‘Save & Close’ : Saves the Organization Chart and closes the window; the new Chart is added to the overview
‘Cancel’ : Cancels the creation of the Organization Chart and closes the window
Next, add Departments.
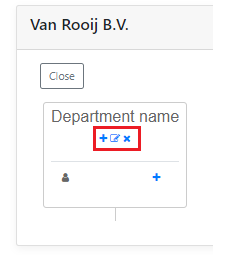
Click on the Organization Chart in the overview screen to open the visual overview of the chart.

Icons above the line, below the name of the Department name :
+ : Adds a new department
pencil icon : Edits the department name (do not use the character “/” or “-” in the name of the Department as this will cause an error in the export and import of the structure)
x : Removes the department
If the Organization Chart is made in a parent connection, there is an option to specify if the Organization Chart is applicable for all children or for specific children.
When an Organization Chart is applicable for specific children, that Organization Chart and its Roles will only be visible for the assigned child connections.

¶ Create an Organization Role
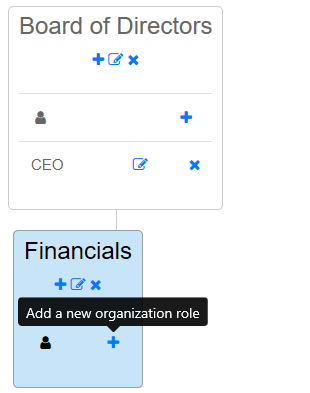
Organization Roles are linked to Departments.
Add the Organization Roles to the Department in the Organization Structure by clicking on the icon “Add a new Organization Role”.
Watch our video on our YouTube channel on how to add Organization Roles with help of the back up option.
¶ A new window opens (as a request) to add an Organization role :
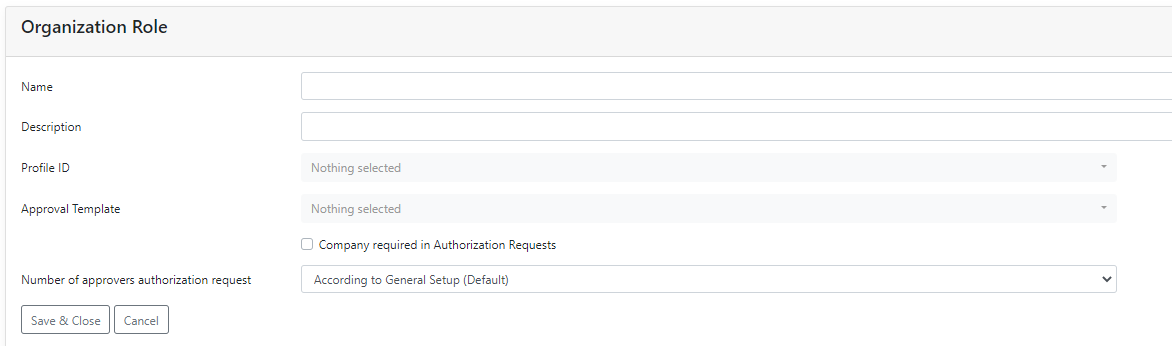
Name : Name for the new Organization Role.
Description : Short description of the Organization Role.
Profile ID : Select a Profile Id if this is applicable.
Approval Template : Select an Approval Template if this is applicable.
Company required in Authorization Requests : Tick the checkbox if this is applicable.
Number of approvers authorization request : Select “According to General Setup (Default)” or select a number to deviate from the General Setup according the Approval settings.
‘Save & Close’ : Saves the new Organization Role and opens the Organization Role card to be finished by adding (at least one) permission set.
‘Cancel’ : Cancels adding the new Organization Role and returns to the overview of the Organization chart.
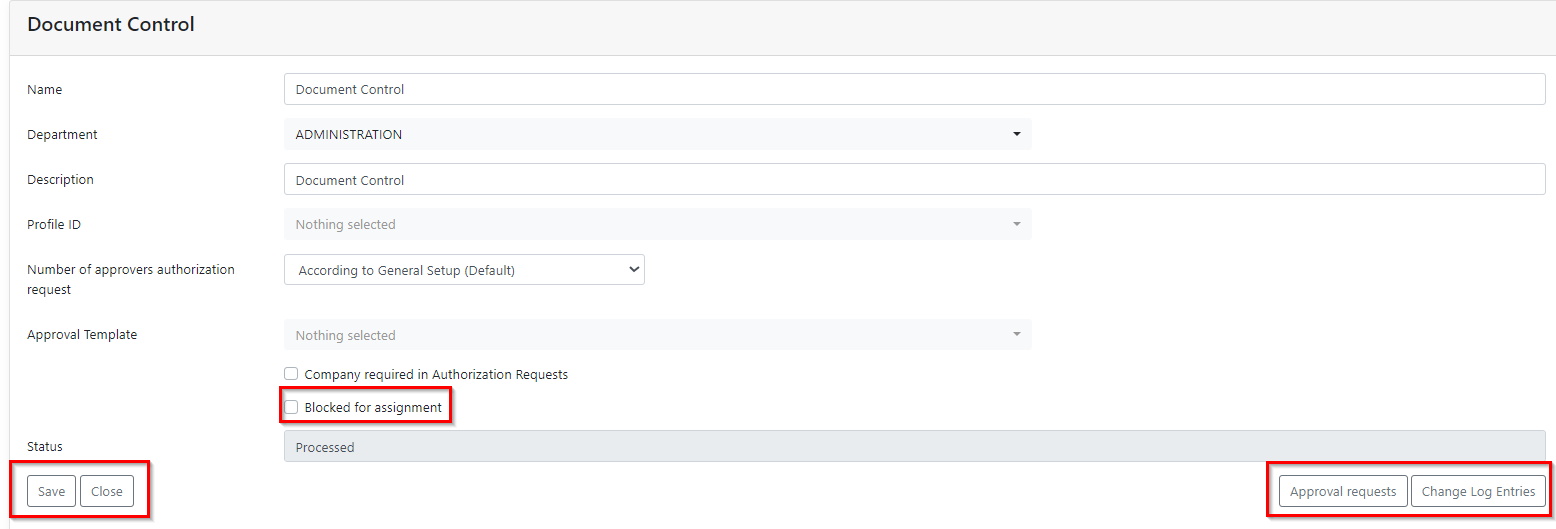
Blocked for assignment : Tick the checkbox if this Organization Role is to be blocked from being assigned.
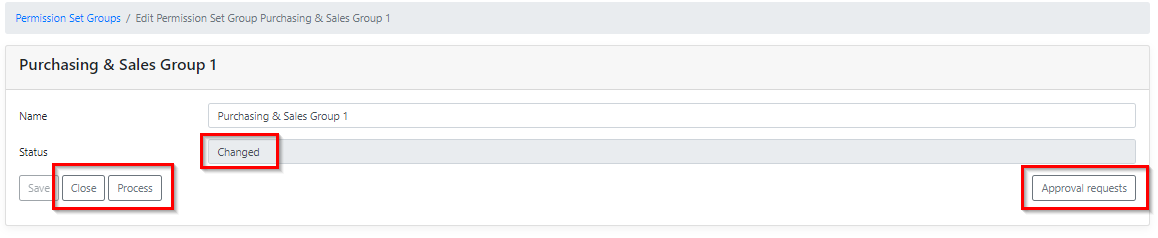
‘Save’ : Saves the request as is.
‘Close’ : Saves the request as is and closes the view. Status is not set to ‘Processed’.
‘Approval requests’ : Shows an overview of all approval requests on this Organization Role.
'Change Log Entries' : Shows an overview of all changes made to this Organization Role.

Status : In case of a new Organization role, the status will be “New”. When any changes have been made the status is “Changed” (or “Waiting to be approved” in case approval was set up) and should be Processed to have the changes applied.
‘Process’ : Processes the request (only visible if no approval is required for this request).
‘Send Approval Request’ (in case approval is required this button will be visible instead of “Process” ) : Changes the status of the request from “Changed” in “To be approved”.
! NOTE : Always make sure the Status of an Organization Role is “Processed” else the permission sets or any changes made to the Organization Role will not apply to a user to which this Organization Role is assigned.
¶ Fasttab Permission Sets
‘New’ : Add Permission Sets to the role (at least 1 set is required to be able to process an Organization role).
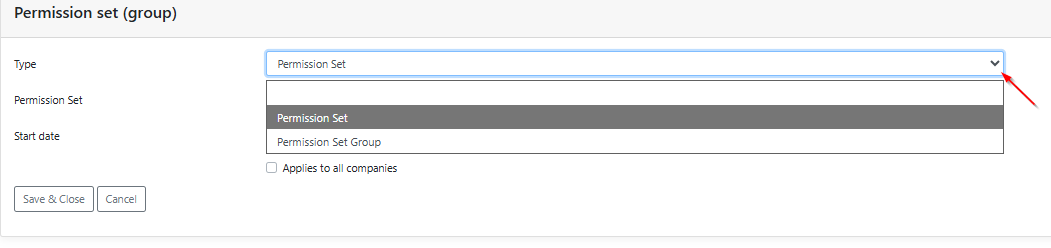
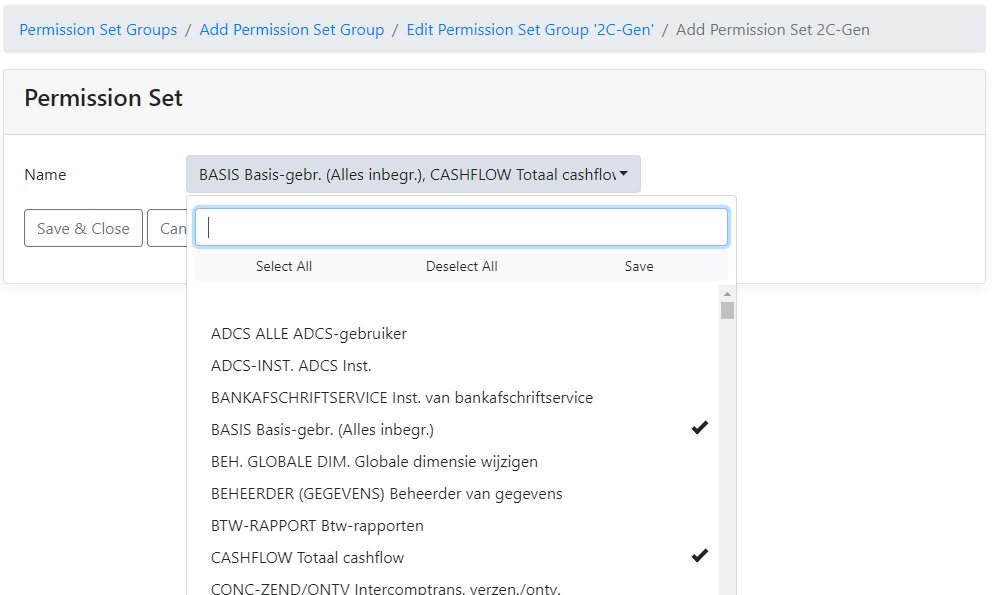
Add Permission sets or Permission set groups.
In the field of Permission Set, multiple sets can be selected by clicking on them. The selected sets will get a checkmark in the overview of available sets.
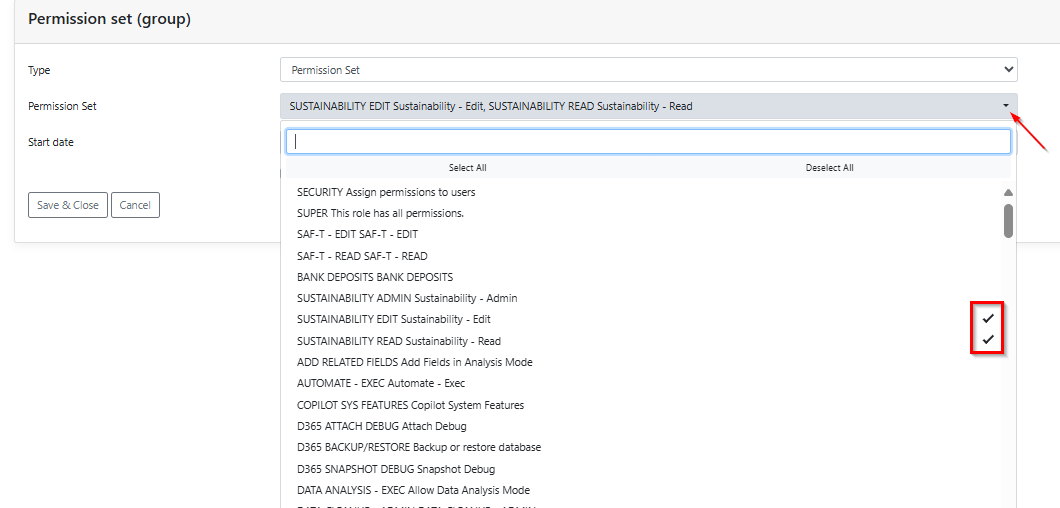
There is also the option to use the checkbox ‘Applies to all companies’.
.png)
When this option is activated, the corresponding permission sets will always be applicable to all companies.
For instance, when this Organization Role has been assigned to a user for company A only, the permission sets where this checkbox was activated in this Organization Role will be applicable for all companies instead of only for company A.
In case a newly made permission set isn't visible in the list, it probably isn't available in the cache yet.
In that case, use the Refresh button to refresh the cache. The permission set should now be present in the list.
.png)
¶ Fasttab Templates
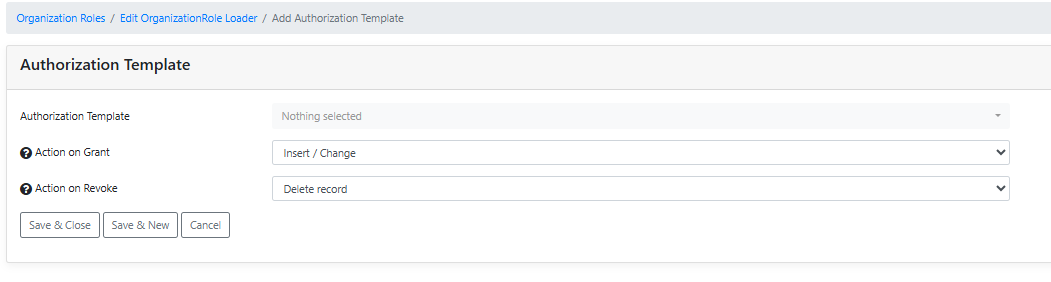
‘New’ : Add an Authorization Template for this role. (a Master template for the same table will automatically be assigned too)
‘Change order’ : Change the order the templates should be processed. (no longer important with the New template processor)
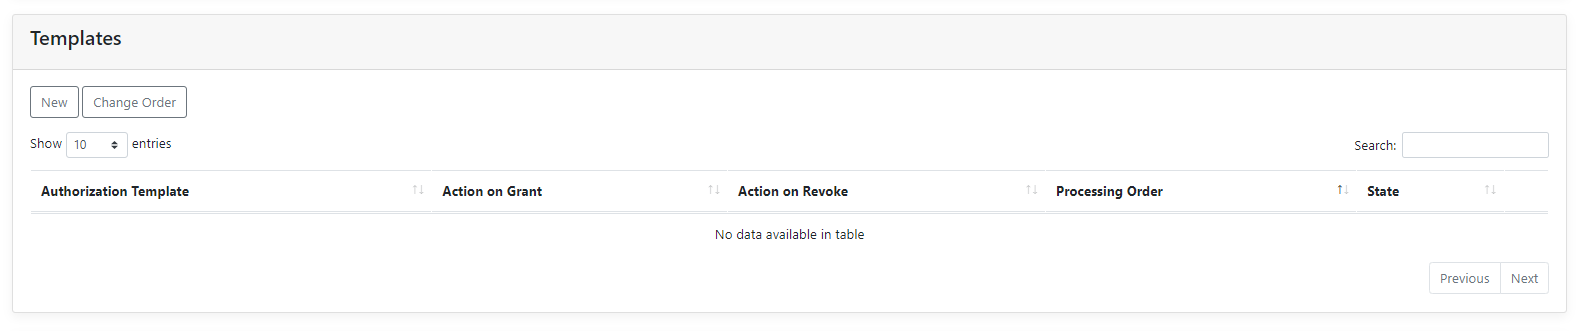
When a template has been chosen, decide which action should be set on Grant ('Insert / Change' or ‘No action’) and which on Revoke ('Delete record' , ‘Change record’ or ‘No action’ ) of the Organization role.
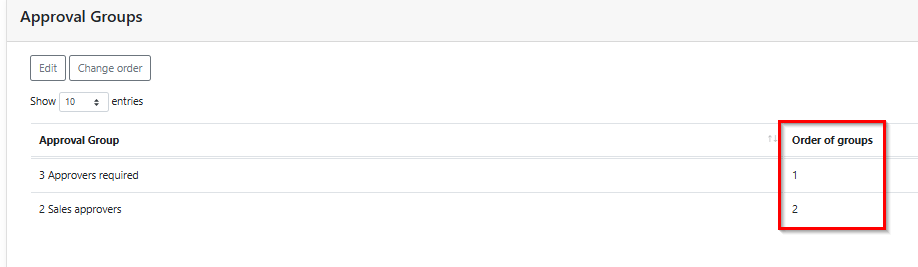
¶ Fasttab Approval Groups
‘Edit’ : Assign to which Approval Group this Organization Role has to be a part of.
Select the required Approval group and use the arrow(s) in the blue bar, to move the required Approval group from the left to the right box. Should Approval groups already have been assigned, removal of a group can be done by moving it from the right to the left box by using the arrow(s) in the blue bar.
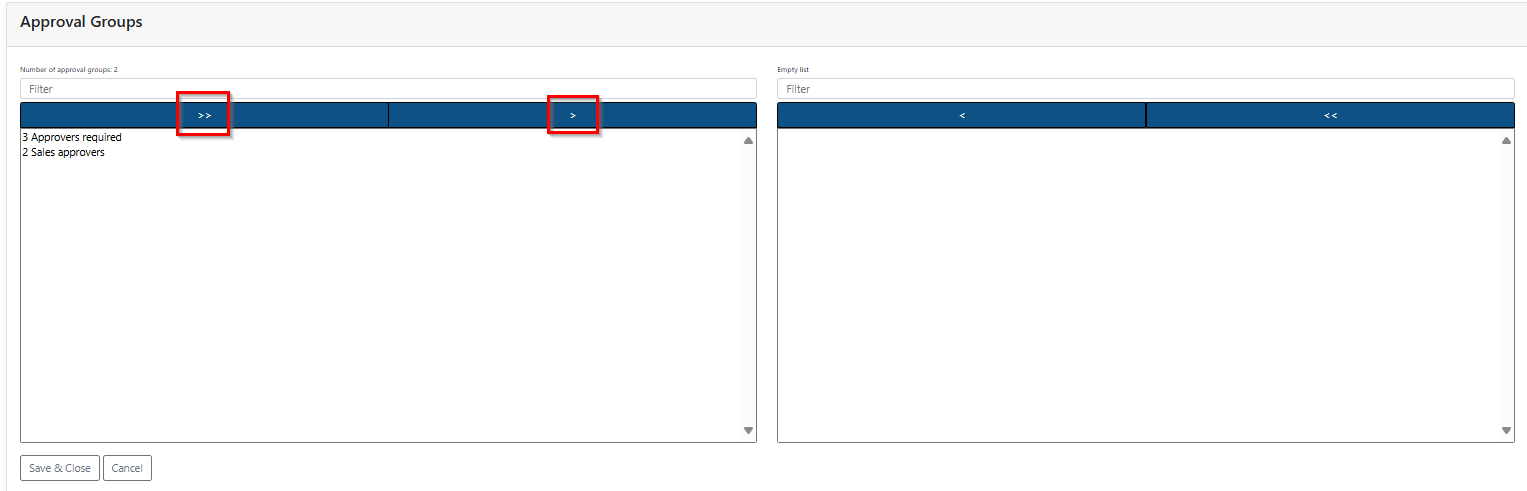
‘Change order’ : Change the order of the Approval Groups in case a request has to be approved.
¶ Export Authorization Matrices to Excel
Go to Authorization Framework => Organization Chart for an overview of all created Organization Charts.
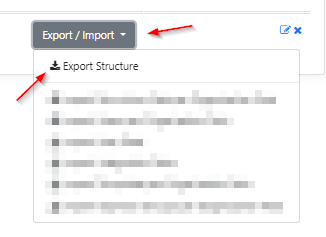
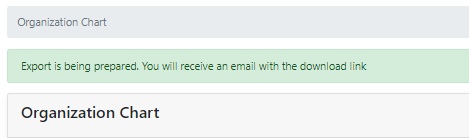
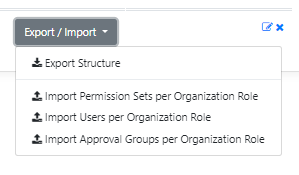
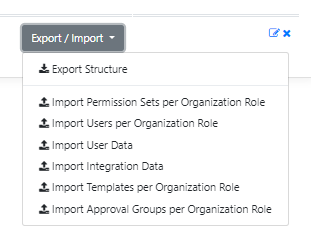
Click on the 'Export/Import' button of the Organization Chart for the option “Export Structure”.
A message appears that an email is being prepared, with which the Structure can be downloaded.
The file to be downloaded is a zip file containing an Excel document with the organization structure. In case changes would have to be made to that document, the option of ‘Enable Editing’ has to be enabled first.

The created Excel file consists of the following sheets:
- Permission Sets: All the Permission Sets in the database and the Organization Roles from the Organization Chart. When a Permission set is assigned to an Organization role, this will be visible by use of an ‘X’ .
- Users: All the Users in the database and the Organization Roles from the Organization Chart. When an Organization Role is assigned to a user, this will be visible by use of an ‘X’ .
- Approval Groups: Overview of all the available Approval Groups and the Organization Roles they have been assigned to. When an Approval group is assigned to an Organization role, this will be visible by use of an ‘X’.
In case our module ‘User Templates’ is in use, the next sheets will also be available :
- User Data: More detailed information of the Users. These are the User data fields available / entered on the User card.
- Integration Data: Details of the Users, in which Company, which Table id/name is used and the Record id of that User. There is also a column to remove integration data, by setting an ‘X’ in that column.
- Templates: Overview of the Authorization Templates and which Organization Roles they have been assigned to with the assigned Grant and Revoke actions to be taken.
Select the option to import.
Don't forget to save the file when changes have been made to the data on the sheets.
Options without our module User Templates :
Options with our module User Templates :
Using ‘Browse’ select the correct(ed) file and click on 'Import'.

Depending on the Approval Settings, the system will process the new authorizations or create new Authorization Requests for the changes made.
‘Cancel’ : Cancels the import of the chosen option.
¶ Create a Company Group
Go to Authorization Framework => Company Groups and click on the button ‘New’. (short video on how to use company groups)
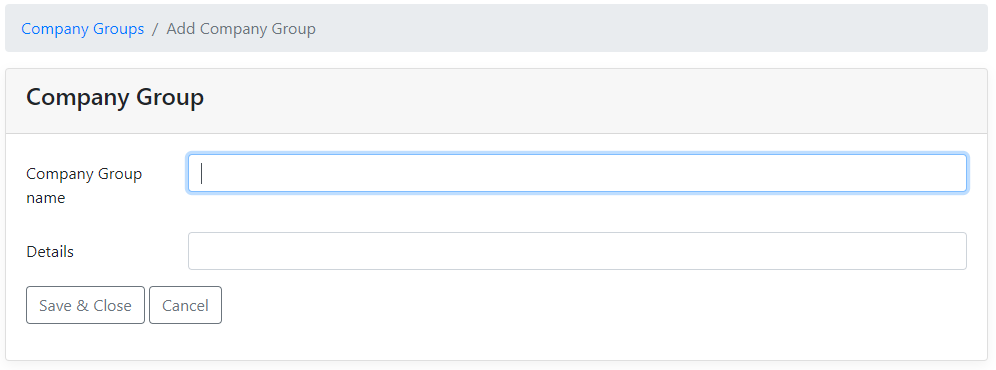
- Company Group name: Enter the name of the Company Group.
- Details: Enter the details of this Group.
- ‘Save & Close’ : Saves the new Company Group and opens the Company Group card.
- ‘Cancel’ : Cancels the addition of the new Company Group and returns to the overview of Company Groups.
After saving the Company Group, select the companies that have to become part of that group.
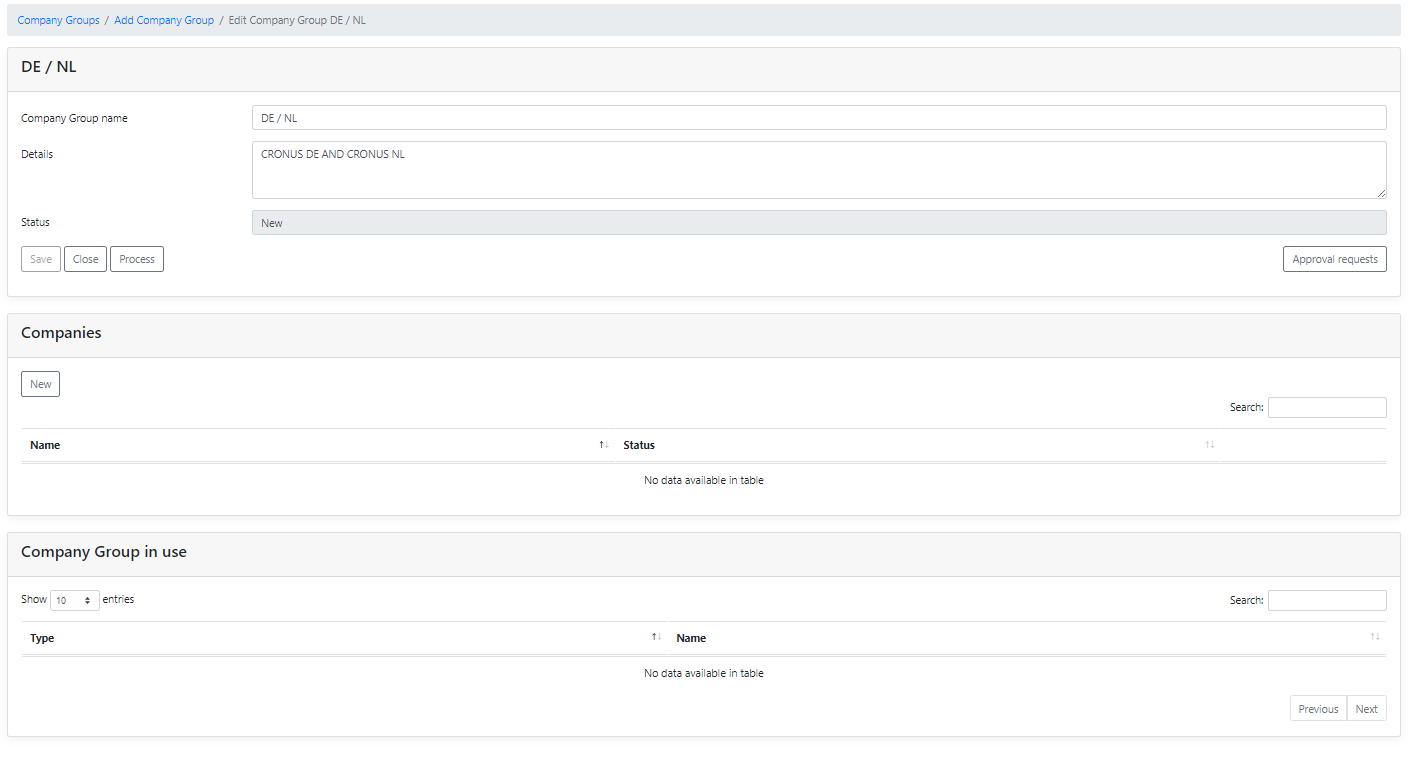
¶ Fasttab “Companies”
Click on ‘New’
Click on the arrow and select the Companies which have to be part of that Group (it is possible to select multiple at once)

‘Save & Close’ : Saves the addition of the selected companies and returns to the Company Group card.
‘Cancel’ : Cancels the addition of the selected companies and returns to the Company Group card.
After saving, the selected Companies have become part of that Group and are visible when that Company Group is selected. In case a Group is selected in a template, the template will be processed on every company in that Group.
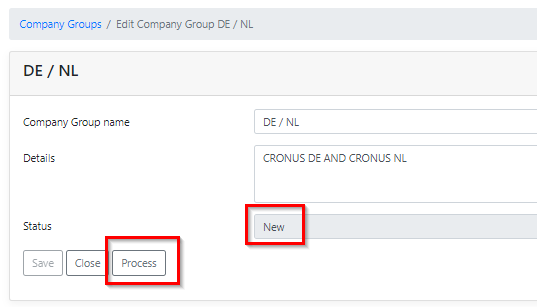
Depending on the Approval Settings, click on 'Process' or ‘Send Authorization Request’ to finalize the grouping of the Companies.
The Status of the Company Group will change from “New” to “Processed”.
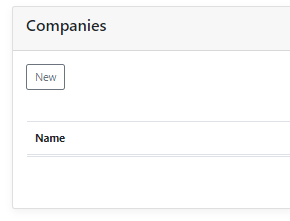
To remove a company from the Company Group, (re)open the Company Group and under the fasttab Companies, click on the X mark icon.
.png)
Depending on the Approval Settings, click on 'Process' or ‘Send Authorization Request’ to finalize the removal of the company from the group.
The status of the Company Group will change from “Changed” (or “Waiting for approval”) to “Processed”.
In case Approval has been set, the approver would first need to approve the request before the status changes to “Processed”.
Changes to a Company Group can be viewed by clicking on the Modifications icon of that Company Group.
.png)
All changes regarding the Company Groups can also be found in the Change Log Entries. (For instance when the Group has been deleted)
(Authorization Framework=>Change Log Entries)
¶ Permission Sets Management
The Permission Set Recorder in the Authorization Box has been replaced by our Compliance Advanced Permissions Recorder app.
As of the 2024.10 release of the Compliance Essentials app, the recorder functionality is no longer available.
For older versions of the Compliance Essentials app, the functionality remained available until 2024/12/31.
The Compliance Advanced Permissions Recorder app can be downloaded from the AppSource or from our Partner portal.
For more information on how to use the Compliance Advanced Permissions Recorder, please see this page in our wiki or watch the presentation on our YouTube channel.
¶ Caching of the Permission Sets
The Permission sets are being cached for performance reasons.
When signing in to the Authorization Box or when switching connections, the system checks when the cache was last retrieved.
If it's older then a day, the cache will automatically be refreshed for that connection.
.png)
In case a (changed) Permission set is not visible, a manually refresh of the permission sets cache from the permission sets page will solve this.
The ‘Refresh’ button can be found in the top right corner of the permission sets page.
It also shows the date and time of the last retrieval of the cache.
There is also the possibility to refresh (all) the cache(s) manually.
This can be found under the menu item Setup => Data caches.
After clicking the refresh/reload icon, refresh the page to see if the caching has been performed successfully.
¶ Record a Permission Set
The Permission Set Recorder has been replaced by our (free) Compliance Advanced Permissions Recorder app.
The Compliance Advanced Permissions Recorder app can be downloaded from the AppSource or from our Partner portal.
For more information on how to use the Compliance Advanced Permissions Recorder, please see this page in our wiki or watch the presentation on our YouTube channel.
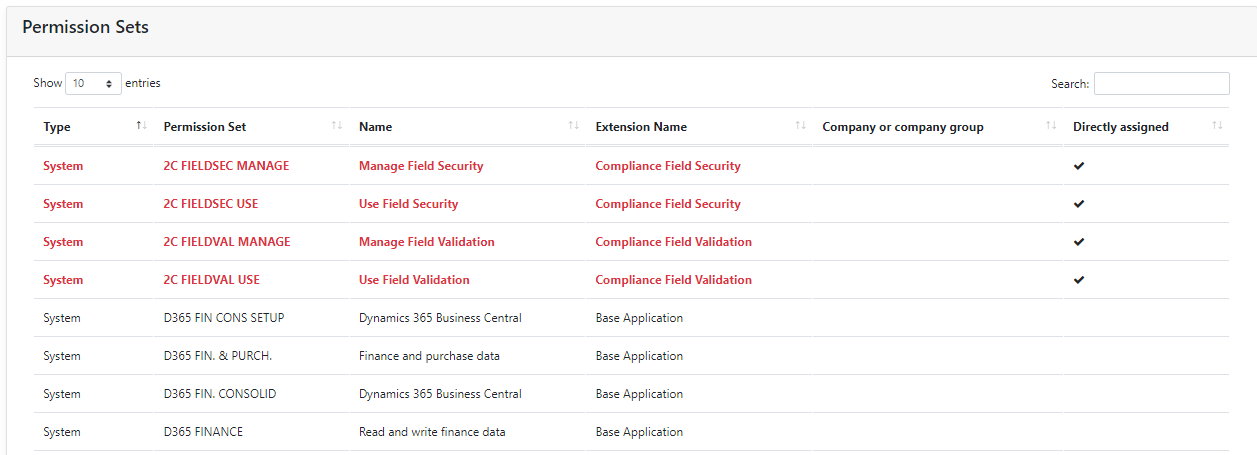
¶ Permission Sets
To view the Permission Sets in the Authorization Box go to Authorization Framework => Permission Management => Permission Sets.
All the Permission Sets from the linked Business Central database will be listed.
The columns in this overview show the Type, Extension Name, No. Of linked Users and No. Of linked Organization Roles.
To see the details of that Permission Set, click on a Permission.
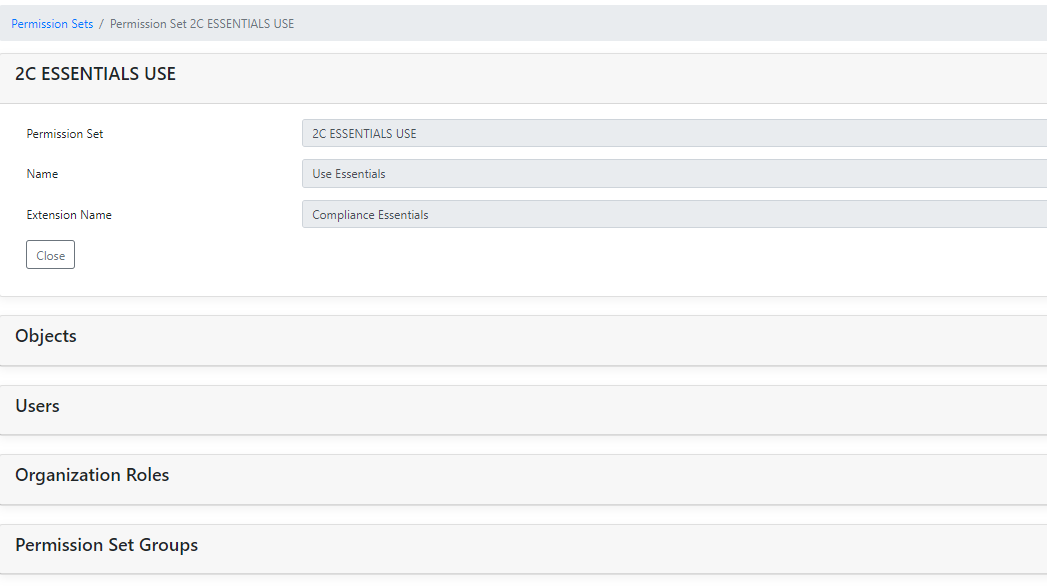
Fasttabs :
- Objects: Objects with permissions linked to the Permission Set (objects from the Expanded Permissions table of scope Tenant are included).
- Users: Users with this Permission Set assigned.
- Organization Roles: Organization Roles with this Permission Set in it.
- Permission Set Groups: Permission Set Groups with this permission Set in it.
Permission Sets added via the Authorization Box, will automatically become ‘User-Defined’ permission sets.
Go to Authorization Framework => Permission Management=>Permission Sets and click on 'New'.
Enter the short name and a name for the Permission Set.

'Save & Close': Saves the addition of the new Permission Set and opens the Permission set card.
‘Cancel’ : Cancels the addition of the new Permission Set and returns to the overview.
After saving the new Permission set, the Objects for this Permission Set can be added under the fasttab Objects.
¶ Fasttab Objects
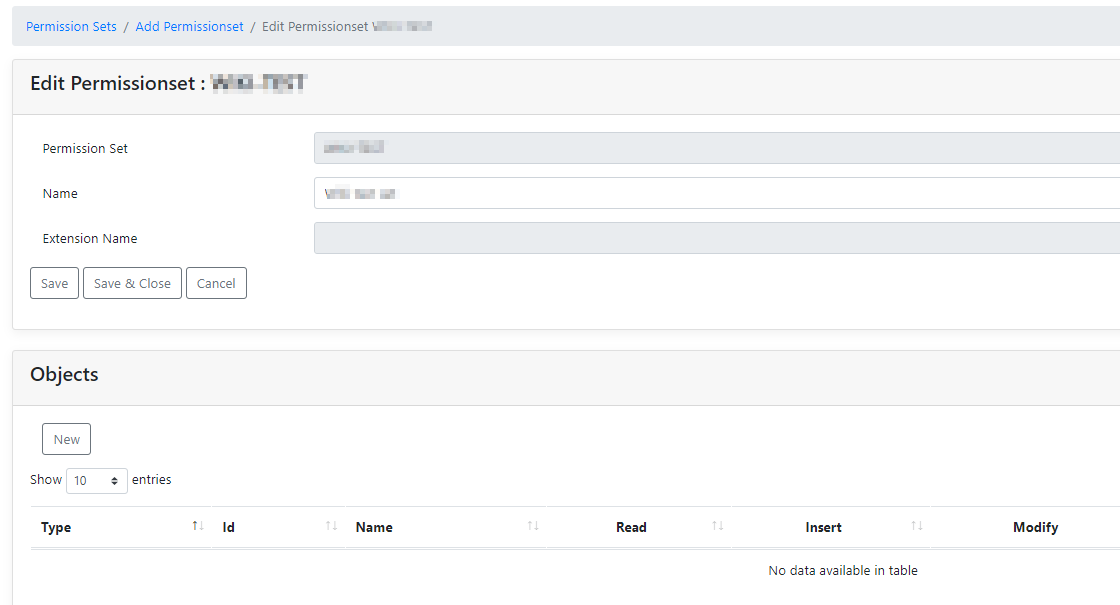
'Save' (in header) : Saves changes made in the header of the Permission set without closing the window.
‘Save & Close’ (in header) : Saves the changes made and closes the window.
‘Cancel’ (in header) : Cancels the changes made and returns to the Permission sets overview.
¶ Fasttab Objects
'New' : add a new Object to the Permission Set.
Available Types to assign to a Permission Set :
TableData : The actual data stored within tables in the database.
Page : Used to display and organize data visually.
Report : Used to structure and summarize data from the database, and to print or display this information in a formatted way.
Table : Used for storing and managing data.
Codeunit : A container for AL code that encapsulates business logic.
XMLPort : Used to import and export data between Business Central and external sources.
MenuSuite : Used in earlier versions (like Dynamics NAV) to define the main menu content displayed in the Navigation Pane. This object is no longer supported in the latest versions of Business Central.
Query : Used to retrieve and manipulate data from one or more tables in the database.
System : This layer includes essential functionalities and services that support the core application, such as authentication, permissions, and data synchronization.
All types (except “TableData”) have the option to select an “Id” and to “Execute”.
The type "TableData", has the following options;
After having chosen an “Id”, assign the rights by choosing ‘nothing’, ‘Yes’ or ‘Indirect’ in the fields for the “Read”, “Insert”, “Modify” and “Delete” permissions.
("Indirect" means, that a user has to have two permissions to i.e. write to a table: the indirect permission to write to the table and additionally the right to execute an object which has the permission to write directly to that table)
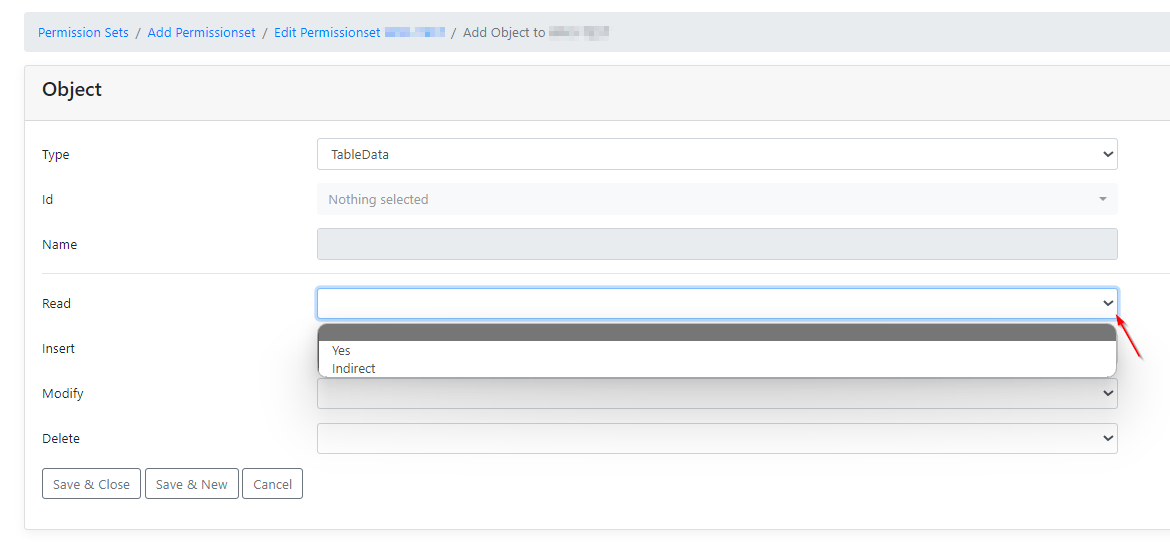
‘Save & Close’ : Saves the addition of the object and closes the window.
‘Save & New’ : Saves the addition of the object and returns to the input screen to add a new object.
‘Cancel’ : Cancels the addition of the object and returns to the Edit Permission set window.
As it is a User Defined permission set, it is possible to edit it afterwards with the pencil icon which will be visible in the Permission sets overview.
[In the near future, approval for the adding and changing of User Defined permission sets will also be required.]
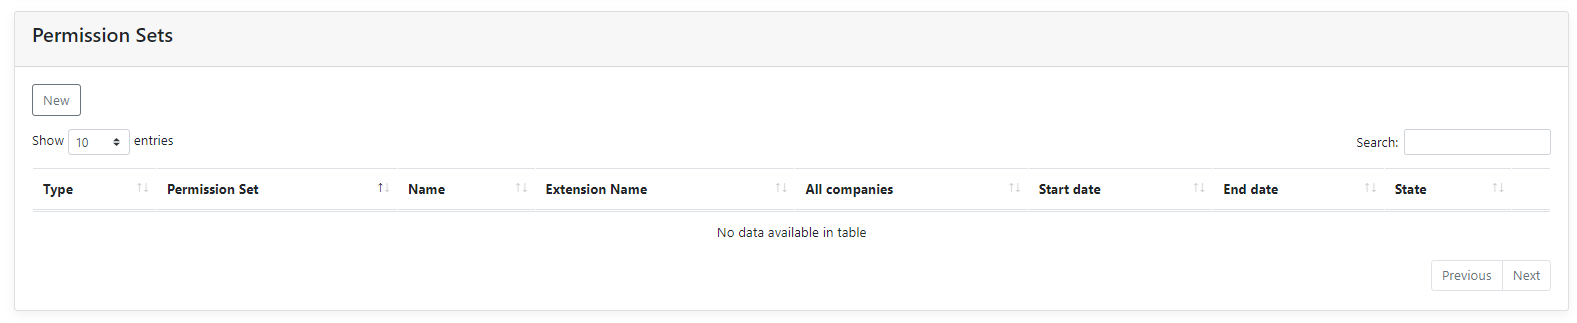
¶ Permission Set Groups
Assign different Permission sets as a group to Organization Roles, using Permission Set Groups. (short video on how to use permission set groups)
To add a Permission Set Group go to Authorization Framework => Permission Management => Permission Set Groups and click on the button 'New'.
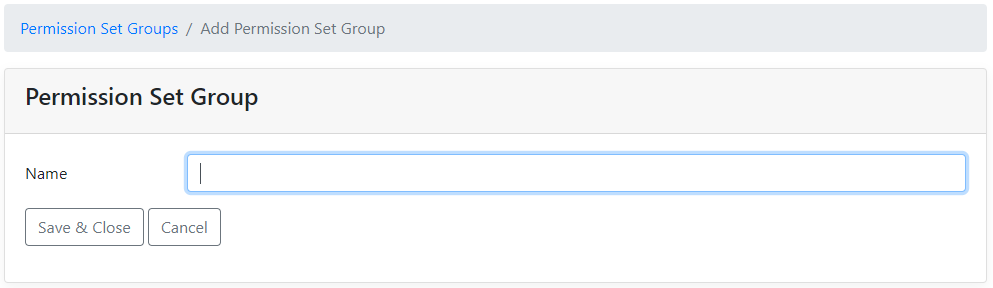
Name : Enter the name for the Permission set Group.
‘Save & Close’ : Saves the new Permission Set Group and opens the Permission Set Group card.
‘Cancel’ : Cancels adding the new Permission Set Group and returns to the overview.
On the Permission Set Group card, select the Permission Sets to be added to this Group in the fasttab ‘Permission Set’.
¶ Fasttab Permission Set
Click on the button 'New' and select the required Permission Sets.
Selecting multiple sets is possible, by clicking on the different names. A check mark will appear behind the chosen sets.
‘Save & Close’ : Saves the selected Permission sets to the group and closes the window.
‘Cancel’ : Cancels adding the selected Permission sets to the group and closes the window, returning to the Permission Set Group Card.
When the required Permission sets have been added to (or removed from) the group, use 'Save & Close'. The header will show the status “Changed”.
To finish editing the group, click 'Process' to finalize the change(s) made, or if approval has been set up, click ‘Send Approval Request’.
When the request has been approved, the status will also change to “Processed”.
Change(s) will only be effective if the Status is set to “Processed”.
‘Close’ : Closes the card and doesn't change the status of the card at that point.
‘Process’ : Processes the change(s) made and changes the status of the card from “Changed" into “Processed”.
‘Approval requests’ : Shows the overview of changes made to that group.
¶ Fasttab Users
If Users have this Permission Set Group assigned, it will be visible here.
¶ Fasttab Organization Roles
If Organization roles have this Permission Set Group assigned, it will be visible here.
Changes to permission sets and permission set groups are visible in the Change Log entries.
¶ User Management
An Authorization Request has to be used to assign or revoke an Organization role to a user.
¶ Caching of the Users
The Users are being cached for performance reasons.
When signing in to the Authorization Box or when switching connections, the system checks when the cache for the current connection was last retrieved.
If it has been longer then a day, the cache will automatically be refreshed for that connection.
When a user had been added, or changes are made to an existing one, either in Business Central or in the Authorization Box, these changes will only be visible after a renewal of the cache.
This would have to be executed manually, as it probably isn't older as a day, when the changes were made.
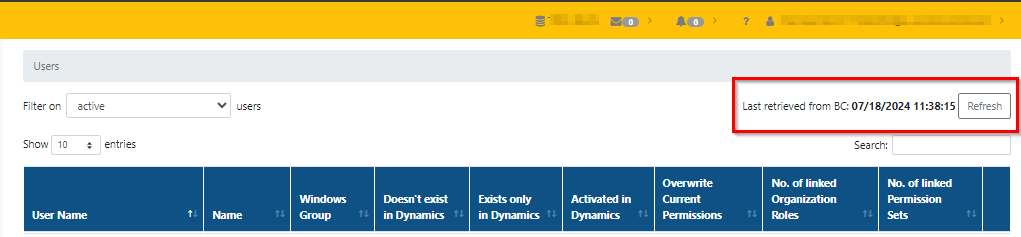
A manual refresh of the Users cache can be performed at the Users page by clicking on the ‘Refresh’ button in the top right corner of the Users page.
The date and time of when the cache was last retrieved will also be visible.
There is also the possibility to refresh (all) the cache(s) manually.
This can be found under the menu item Setup => Data caches.
After clicking the refresh/reload icon, refresh the page to see if the caching has been performed successfully.
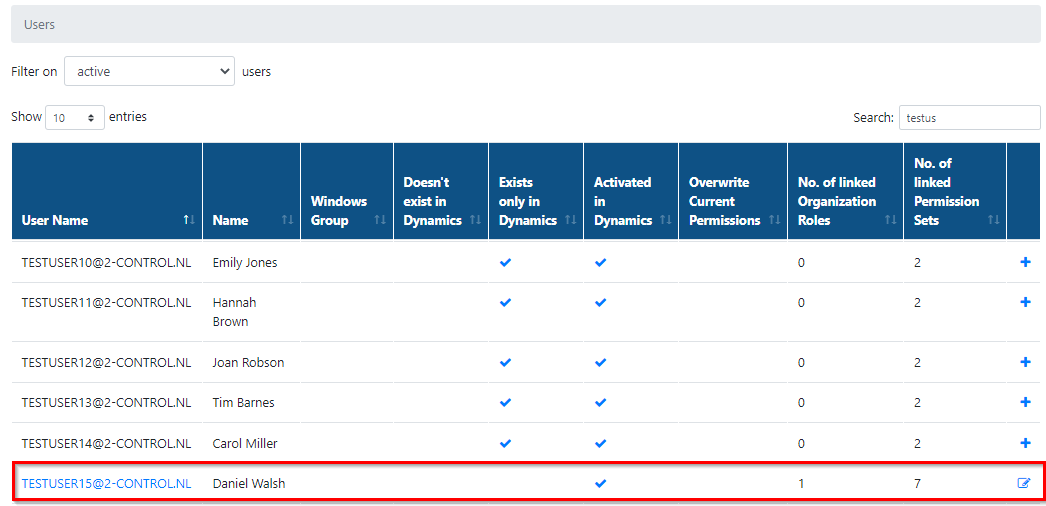
¶ Users
View and manage users with the menu option ‘Users’ within User Management.
Default only the Active users will be visible. To change this, select an other option in the top left corner with “Filter on … users”.
The option ‘all’ contains all users from the Business Central and Authorization Box environment, including users deleted from Business Central.
.png)
Sample of an overview :
.png)
When an active user does not have a checkmark in “Exists only in Dynamics” it is possible to edit this user by clicking on the pencil icon.
In that screen, the setting “Overwrite Current Permissions” can be changed.
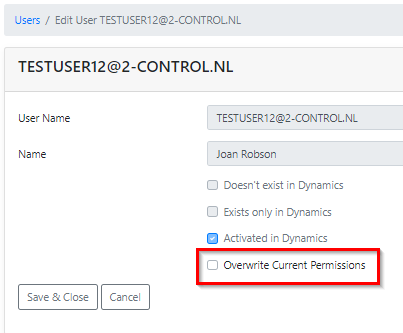
When this box is checked, the user will only have permissions based on assigned Organization Roles in the Authorization Box.
‘Save & Close’ : Saves changes and returns to the User overview.
‘Cancel’ : Cancels changes and returns to the User overview.
Should the changes not have been synced with Business Central, a sync task can be started manually by opening the User, click on ‘Synchronize’ and use the option “All”.
.png)
For a user which is not activated for the Authorization Box, a request for changes can be added by clicking on the 'Plus (+) sign',

or by using the menu option User management => Authorization requests → New and selecting that user in the Dynamics User field.
For a user which is activated in the Authorization Box, the button ‘New authorization request’ can be used on the User page.
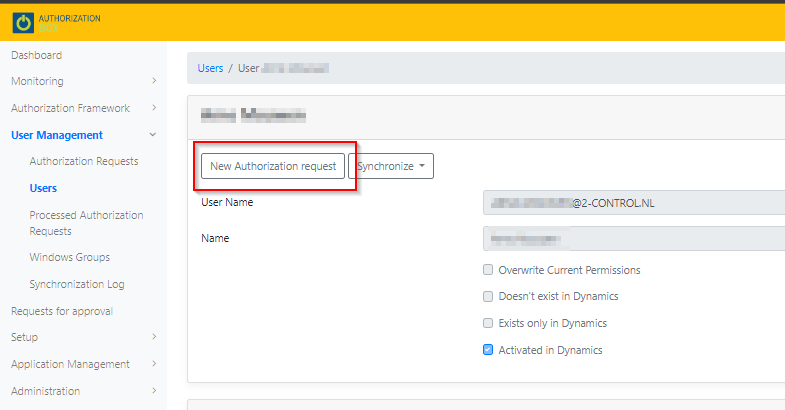
Or go to User Management=> Authorization Requests→ New and selecting that user in the Dynamics User field.
¶ User Card
Click on the User Name of a user in the overview (User management=>Users) which is activated in the Authorization box (colored blue and has a link) to open the User Card of that particular user.
¶ In the header (fasttab with the name of that user) :
.png)
‘Close’: Closes the user card and returns to the users overview.
‘New Authorization request’ : Opens a new authorization request for this user.
‘Synchronize’ : Synchronizes the user with Business Central. Clicking on the button shows two options : “To be processed” and to fully synchronize this user “All”.
User Name : Is populated automatically when the user was made.
Name : Is populated automatically when the user was made.
Checkbox “Overwrite directly assigned permission sets” : When this box is checked, all directly assigned permissions to this user in Business Central, will be removed with the daily synchronization, unless they are part of one of the organization roles assigned to this user.
Checkbox “Doesn’t exist in Dynamics”: Box is checked when the user is not available in Business Central (=removed/deleted).
Checkbox “Exists only in Dynamics”: Box is checked when the user is not activated in the Authorization Box (only visible as a checkmark in the Users overview).
Checkbox “Activated in Dynamics”: Box is checked when the user has the status Enabled in Business Central.
¶ Fasttab Organization Roles
Overview of the organization roles assigned to this user.

- Organization Chart : The organization chart of which this organization role is a part of. Clicking on it opens that organization chart.
- Department : The department of which this organization role is a part of.
- Name : The name of the organization role. Clicking on it opens that organization role card.
- Company : Shows if an organization role was assigned “overall” or for a specific company or company group.
- Start Date : The date the organization role was assigned.
- Assignment processed : Shows a checkmark when the assignment of the organization role has been fully processed.
- End Date : The date the organization role will be revoked.
- Revoke processed : Shows a checkmark when the revoke process has been completed.
- Blocked for assignment : Shows a checkmark if the assigned organization role has been blocked for assignment.
- ‘return icon' : To reprocess the assignment of the organization role and produces a new Authorization Request to reassign the organization role to the user.

¶ Fasttab Permission Sets
Overview of the permission sets assigned to this user.
The permission sets assigned directly through Business Central (and not with an Organization role in the Authorization Box) will be visible in red and have a checkmark in the column “Directly assigned”.
When the option of “Overwrite directly assigned permission sets” is checked for the user, the red permission sets should not be present in this overview.
¶ Fasttab Processed Authorization Request Lines

- Created by : Who created the authorization request.
- Created on: Date and time when the authorization request was created.
- Processed on : Date and time when the authorization request was processed.
- Organization Chart : Name of the organization chart the authorization request was made for. Clicking on the name of the chart opens that organization chart.
- Organization Role : Name of the organization role used in the authorization request. Clicking on the name of the organization role opens that organization role card.
- Company : Name of the company or company group used in the authorization request. If blank, the authorization request was made for all companies.
- From : The start date used in an authorization request, which is the date the organization role should be effective.
- Until : The end date used in an authorization request, which is the date the organization role should be revoked.
- ‘Magnifying glass icon’ : Opens the authorization request.
¶ Fasttab User Data
Overview of the available personal user data.
There are several sections you can expand :
- Integration : Overview of datafields in Business Central which are populated through a template and maintained through the Authorization Box using the templates.
- Address : Address details for that user.
- Additional Information : Additional information details for that user.
- Free Fields (only available with the module User Templates) : Fields shown are specified beforehand and can be populated or changed through an authorization request or a template.
¶ Fasttab Processed Actions (only available with the module User Templates)
Overview of all the actions on this user that have been processed when executing the Templates which are part of organization roles assigned to this user, or/and pre- or post actions executed for that user.
Clicking on the magnifying glass, will show the query executed for that template, showing e.g. the approver and the amounts applicable according the approval template.

Also, when a synchronization task has resulted into an error because of a query, the details in this fasttab will show why that synchronization was unsuccessful.
The column “Error Text” will describe why the query could not be executed.
¶ Fasttab Synchronization Log
This fasttab shows an overview of the synchronizations on this user.
Whenever a change has been made to an organization role assigned to this user, or any other changes in the Authorization Box which have impact on the user, a synchronization will be run and shown in this log.
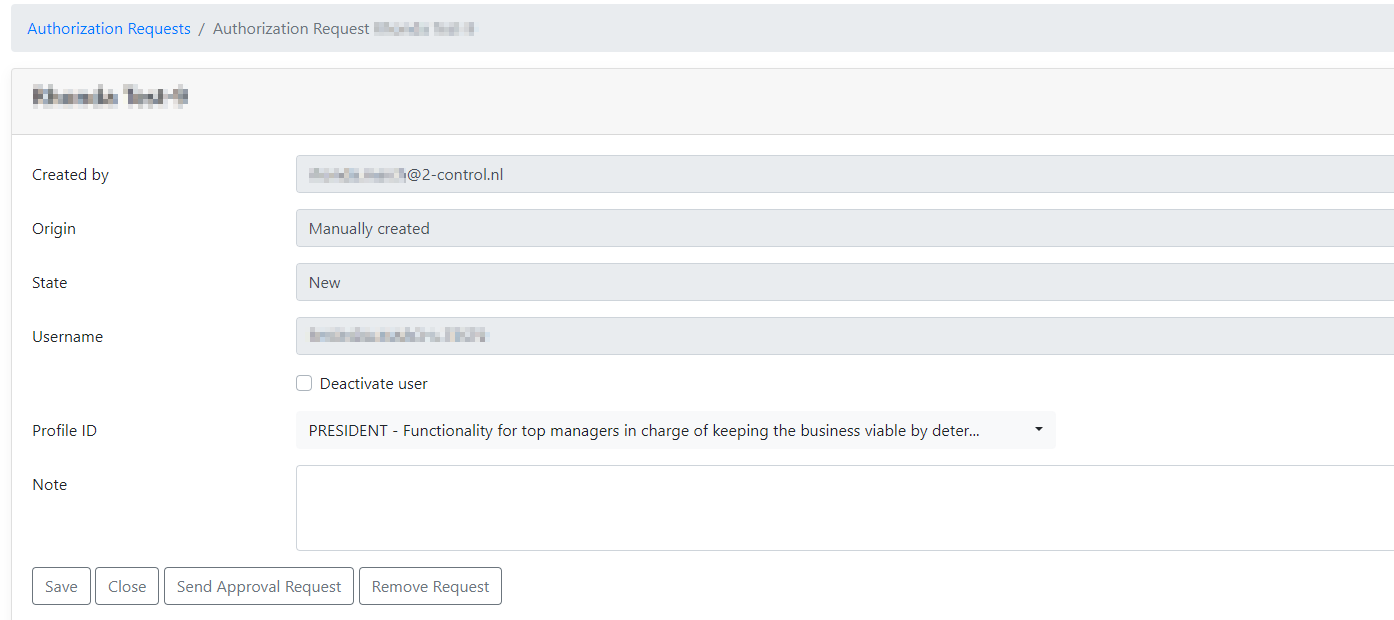
¶ Create an Authorization Request
Create an Authorization Request to assign or revoke an Organization Role to/on a user. A video about Authorization Requests can be found on our YouTube channel.
To create a new Authorization Request, navigate to User Management => Authorization Requests .
In this screen, create new requests or delete outstanding requests.
Requests can only be deleted when they have the status ‘Canceled’ or ‘New’.
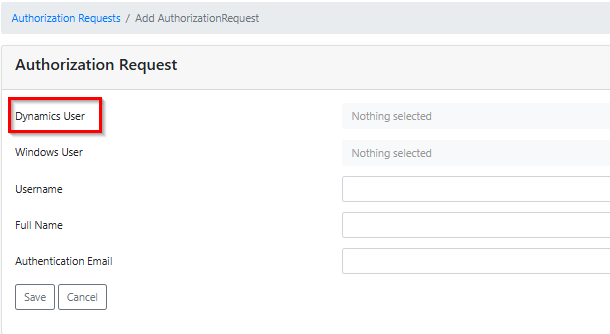
To create a new Authorization Request, click the ‘New’ button.
.png)
- Dynamics User: Select in this field an existing Dynamics 365 Business Central User. After selecting the User, the field Username and Full Name are automatically entered.
- Windows User: Select in this field a Windows User. The Authorization Box will create this User in Dynamics 365 Business Central.
- Username: Enter a username to create a new Business Central User.
- Full Name: Enter the Full Name for the new Business Central User you filled in at the Username section.
- Authentication Email: Enter the email address that will be used to create the/a Microsoft Entra user.
Click on ‘Save’ to finalize the Authorization Request.
In the header of the next screen, the following options are presented.
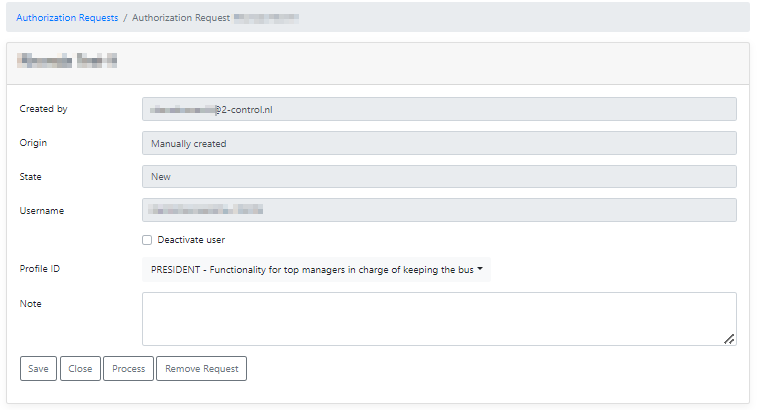
- Deactivate user : Check this option to deactivate an existing User in Business Central.
- Profile-id : In case of a new user : select the Profile-id for this user (if applicable).
- Note : Option to enter any remark and use several text lines. This text will be visible in the Request for Approval.
Click on ‘Save’ to save the changes made so far.
Assign or revoke an Organization Role (or Roles).
In case of a new user, it is mandatory to assign at least one (1) Organization role.
When approval is enabled, click on ‘Send Approval Request’ to have the request processed further, or ‘Cancel Request for Approval’ to cancel the request.
If Approval is not enabled, click on 'Process' to have this Request processed or ‘Remove Request’ to cancel the request.
¶ Assign Authorizations
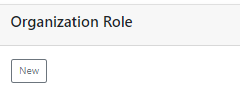
To assign an Organization Role to the User, click on ‘New’ under the fasttab “Organization Role”.
The following options are presented to fill / select :
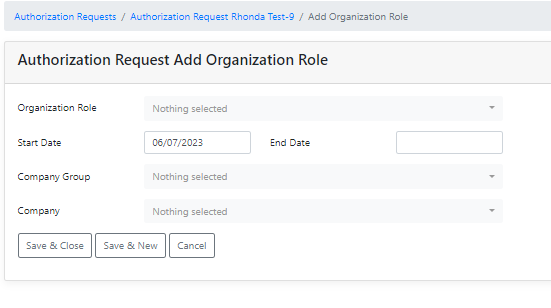
- Organization Role : Select the Organization Role to be assigned to the User. Only Organization Roles which have the status “Processed” are available.
- Start Date / End Date : Enter a Start Date and, if applicable, an End Date. When a Start Date has not been assigned, the system will use today as Start Date. When another date is entered, the Authorization Request will be processed on that date with Start time, based on the Synchronization Template.
- Company Group: Select a Company Group to assign the rights to the Companies of a particular Group.
- Company: Select a Company to assign the rights only for that particular Company.
Click on ‘Save & Close’ to finish adding Organization Roles to this User.
Click on ‘Save & New’ to add an other Organization Role to this User.
The newly added Organization Role(s) are now visible with the state “New”. At this time it is also possible to edit this line in the Organization Role by clicking on the ‘Edit pencil’ at the end of that line (e.g. to use an other Start Date or assign an other Company etc.) . To finished editing, the screen can be closed with ‘Save & Close’.
To remove this new Organization Role, click on the ‘Revoke button (x)’ at the end of that line.

¶ Revoke Authorizations
If one or more Organization Roles were already assigned to a User, it can be revoked through a new Authorization Request.
In a new Authorization Request, click on the ‘Revoke button (x)’ next to the Organization Role to be revoked.
Or use the checkboxes and the button "Revoke' . When using the checkbox in the title bar, all assigned organization roles will be checked at once.
After entering the End Date and clicking on ‘Save’ the State will show “To be deleted”.
.png)
After processing the request, the Organization Role(s) will be removed from the user or, in case a date in the future was given on the given date.
¶ Processing Authorization Request
As soon as the Authorization Request is complete, an approval has to be sent.
This is only required if the number of approvers is not 0 (zero) for the Organization Role(s) in the Authorization Request.
In case no Approval has been set, the ‘Process’ button is available on the Authorization Request.
By processing the Authorization Request, the Permissions will be linked to the user in Business Central.
If approval is required, press the button ‘Send Approval Request’.
The state of the request will change to “Waiting to be Approved”.
To cancel the Approval request, use the button ‘Cancel approval request’.
If required, changes can still be made in the Authorization Request. Tr cancel the whole Authorization Request use the button ‘Cancel request’.
When a change on an Organization Role is rejected, the status will be “Rejected”.
!! The rejection of the change on the Organization role still has to be processed.
To process this rejection, go to User Management => Authorization Requests, open the request and click on ‘Process’.
The processing of the Authorization Request is performed in the background. Therefore it is possible the result is not immediately visible in the Authorization Box.
If changes have been processed, the system creates a synchronization log record.
This record shows the basis on which the synchronization took place (for example an authorization request) and for which user this was done.
¶ View processed Authorization Requests
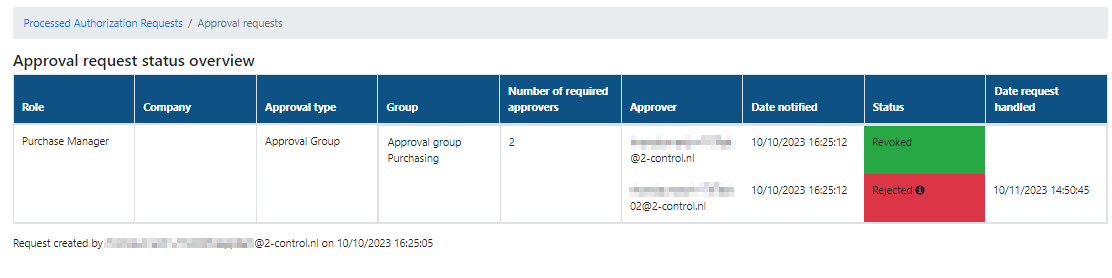
Processed Authorization Requests are visible in User Management => Processed Authorization Requests.
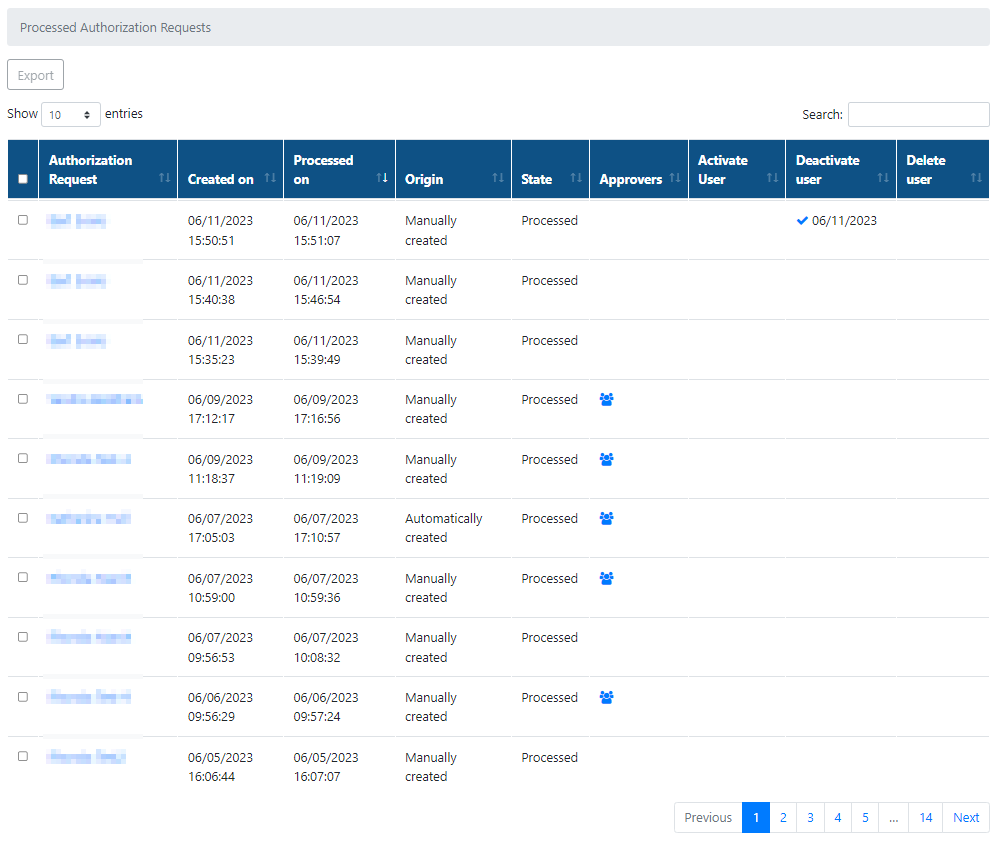
Click on the name in the column Authorization Request to view the details of that request.
When approvers were required for a request, an icon will be visible in the column “Approvers”.
Click on it to view the details of the approved/rejected request.
¶ Approval Management
Set up if and/or how many approvers would be required for authorization requests with approval management.
Assign approver(s) and set up how many approvers would be required in general, or assign a different number of approvers to organization roles.
To deviate from the default number of approvers, assign the number of approvers on the role it self or make use of approval groups.
¶ General approval settings
Use Setup => Approval settings to change if approval on requests are required.
A default number of approvers can be set up for :
- company groups (add/edit requests)
- permission set groups (add/edit requests)
- organization roles (add/edit requests)
- authorization requests
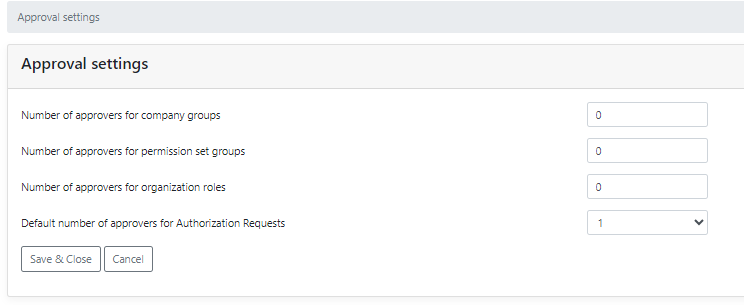
The number of approvers which are set in these fields are the number of approvers which will be required when the Number of approvers in an organization role is set to “According to General Setup (Default)”.
¶ Approvers
Go to Setup=>Approvers, to assign the approvers.
Click on ‘New’.
Select the user to assign approval rights to.
Select the approval type(s) to assign to that user.
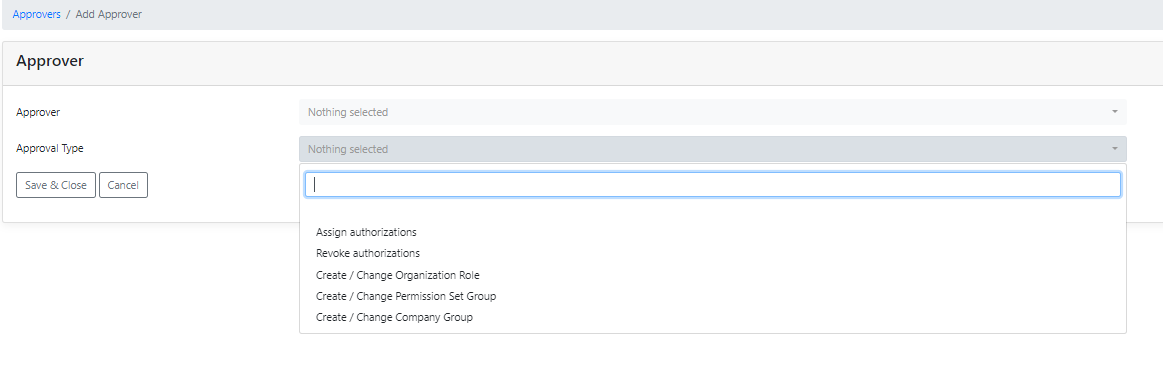
‘Save & Close’ : Saves the assignment(s) and closes the screen.
‘Cancel’ : Cancels the assignment(s).
¶ Approval Groups
Setup how many approvers are required for the assignment of certain organization roles by using Approval Groups.
Go to Setup=>Approval Groups.
Click ‘New’.
Give a description for the Approval Group.
Set the number of required approvers for that group.
Click ‘Save & Edit’.
¶ Fasttab Users :
Select which users should approve according to that group by moving them (with the arrow(s)) from the left to the right part.

‘Save’ : Saves the changes made.
¶ Fasttab Organization Roles :
Select the role(s) this group should be assigned to by moving them (with the arrow(s)) from the left to the right part.
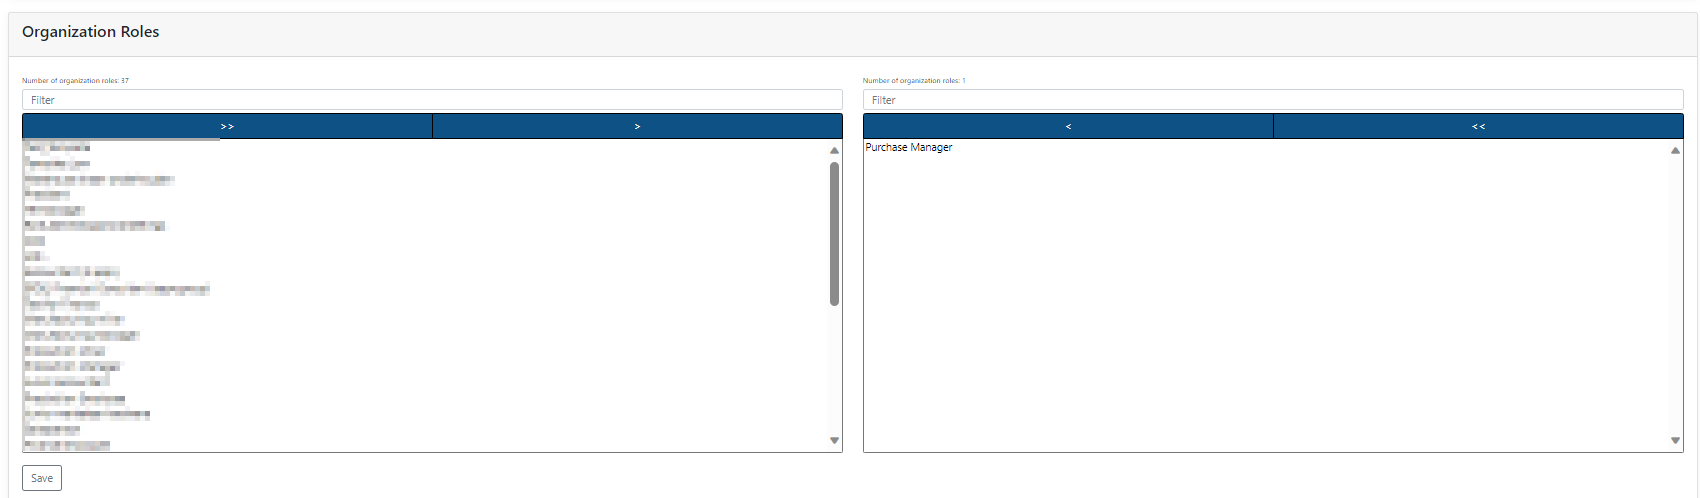
‘Save’ : Saves the changes made.
‘Save & Close’ in the header : Saves the settings in that Approval Group.
A confirmation that the settings have been changed will appear.

The Organization role(s) will also show this approval group has been assigned to that/those role(s).

Even if the Default General Settings is set to “No approvers” for any request, an authorization request for this role still needs 2 approvers.
¶ Different number of approvers for an organization role
Besides the “Default” assigned number of approvers, a different number of approvers can be assigned for an organization role by using the field “Number of approvers authorization request”.
!! Make sure to process this change to activate this number of approvers.

¶ Authorization requests on a user
User Management=>Authorization Requests will show an authorization request made on a user and sent for approval, or when a request was made and closed without processing.
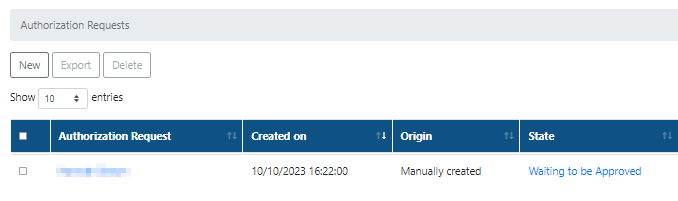
Click on “Waiting to be Approved” for the overview of that approval request.
It will show how many approvers are required, which approver(s) would be required and what the status is. It also shows who made that request and when.
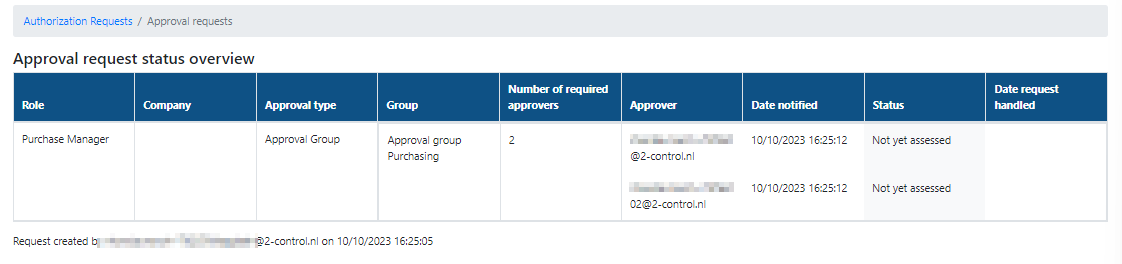
The approvers will receive a notification that a request has to be assessed and can find this request in “Requests for approval”.
In the Requests for approval, the Pending requests shows :
- Request User : Who made the request,
- Type : The type of request,
- Description : A description of the request,
- Created on : When it was created,
- Response : How many approvers would be required.
The number mentioned in the green oval under ‘Response’ mentions the number of approvers required for that authorization request.
For instance, when in an authorization request where 3 organization roles are to be added to a user, and each organization role requires 1 approver, the number in the green oval will show the number “3” even though the request would be fully approved if 1 approver approved the request.
An other example, when in an authorization request where 3 organization roles are to be added to a user, and 1 role requires 2 approvers, the number in the green oval will show the number “4”.
In the below example, 2 approvers are required. In case 1 of the approvers already reviewed, the number in the green oval would be 1 / 2.

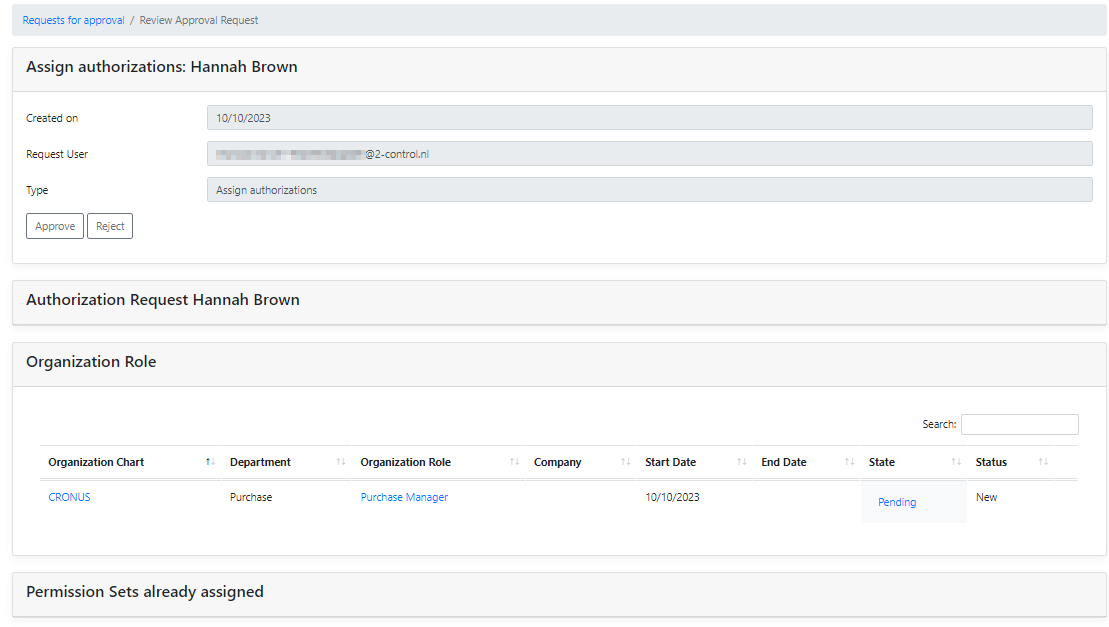
The approver can use the 'eye icon' (column Review) to open the request to approve or reject the request.
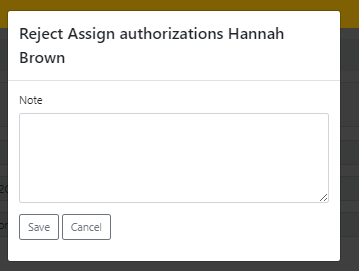
When a request is Rejected, a memo field will appear to enter the reason of rejection or any other note which will be visible in the Processed authorization request.
A rejected request (still visible in the Authorization Requests), needs to be Processes manually. Once processed, this rejection will appear in the Processed Authorization Requests. (User Management=>Processed Authorization Requests)
Opening the rejected request will show details of the rejected approval.
Hovering over the ‘Information icon’ behind “Rejected” in the Status column, will show the note which was made during rejection.
A video on Approval Setup can be found on our YouTube channel.