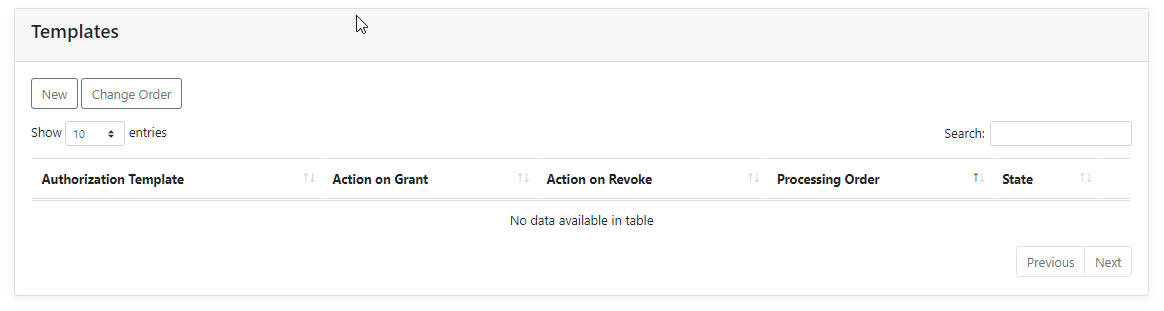
Templates
Authorization Templates are used to flexibly setup user related tables in Dynamics Business Central, including extensions / customization and to define how the records are to be filled.
For example: when authorizing users as sales employee, the users are assigned all the permissions sets required for that function through the organization roles.
Besides the permissions, it is possible with templates to automatically create a record in the sales person table in Business Central for the new sales employee.
Thus, templates make it possible to create records in certain tables after assigning an organization role to a user. When removing a user's organization role, the created record can be deleted or changed.
There are two types of Authorization templates.
- Master Template : Can be used to assign the generic fields (for all users), including the key fields of the table and is linked to an Authorization Template.
- Authorization Template : The specific fields for some users can be assigned by using Authorization Templates.
The user data and the free fields, combined with the templates, can be used to easily maintain user related data in Business Central.
The templates of the same table are combined and processed in one single query.
Templates will be processed with every synchronization action.
The Authorization Box only changes data in Business Central if there is a difference in values in Business Central data and the values in the fields according to the Authorization Box.
Approval Templates are used to determine which limits apply for Purchasing, Sales and Requests.
These templates are assigned to Organization Roles and can also be temporarily assigned to Users individually.
¶ Master Template
For setting up a Master Template go to Authorization Framework => Templates => Master Templates and click on 'New'.
.png)
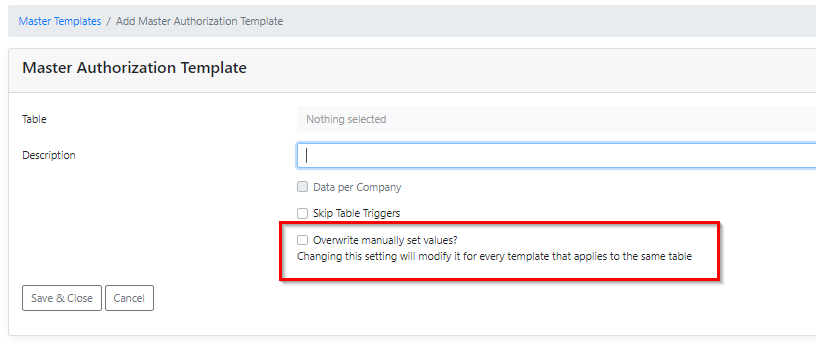
Table : Select the table that has to be used for the Master Template.
Description : Enter a description for the new Template.
Skip Table Triggers : Check the box if table triggers are to be skipped.
Overwrite manually set values? : Check the box if it has to be modified for every template that applies to the same table. Checking this setting will allow the Authorization Box to be leading in how to process the default set values. For an explanation on this setting, see this part of the wiki.
Click on 'Save & Close'.
In the next screen click on ‘New’ to add a Template Line.
.png)
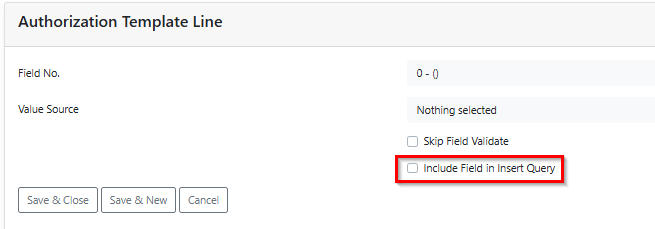
Field No. : Select the field that has to be filled automatically when using the Template.
Value Source : Select the value source to be used:
- Value : Enter a fixed value to be used.
- User : Use the user information from the user card, free fields included.
- Organization Role of user : Use the information from the Organization Role card, free fields included.
- No. Series : The no. series set up for that table will be used.
Skip Field Validate : Check the box if the Field Validation has to be skipped.
Include Field in Insert Query : Check the box to add a non-key field to the insert query.
Click on ‘Save & Close’ to finish or click on ‘Save & New’ to add a new line for that Template.
¶ Authorization Template
Go to Authorization Framework => Templates => Templates and click on 'New'.
.png)
Table : Select the table that has to be used for this Authorization Template.
Description : Enter a description of the new Template.
Data per Company : This box will be automatically checked if a table has been chosen for which the data is set per company.
Skip Table Triggers : Check the box if the table triggers are to be skipped.
Overwrite manually set values? : Check the box if it has to be modified for every template that applies to the same table. Checking this setting will allow the Authorization Box to be leading in how to process the default set values. For an explanation on this setting, see this part of the wiki.
Click on 'Save & Close'.
If a Master Template is available for that table, the box “Has Master Template” is checked when the new template has been added.
.png)
¶ Setup the template by adding Template Lines
Click on 'New' to add a Template Line.
.png)
.png)
Field No. : Select the field that has to be filled automatically by using the Template.
Value Source : Select the value source to be used.
- Value : Enter a fixed value.
- User : Use the user information from the user card.
- Organization Role of user : Use the information from the Organization Role card.
- No. Series : The no. series from that table will be used.
Skip Field Validate : Check the box if the Field Validation has to be skipped.
Include Field in Insert Query : Check the box to add a non-key field to the insert query.
Click on ‘Save & Close’ to finish or click on ‘Save & New’ to add a new line for that Template.
¶ Link an Authorization Template to an Organization Role
To link the template to an Organization Role go to Authorization Framework => Organization role and open the Organization Role to assign this / an Authorization Template.
Click on 'New' on the fasttab “Templates”.
In the next screen enter the required fields.
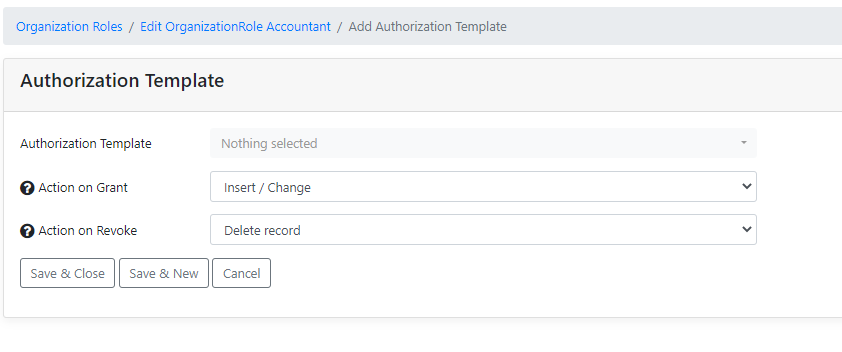
Authorization Template : Choose the Template that has to be linked to the Organization Role.
Action on Grant : Choose the action the Template needs to execute when granting the Organization Role to a user. (Insert/Change or No Action)
Action on Revoke : Choose the action the Template needs to execute when revoking the Organization Role from a user.
Click on 'Save & Close' to finish adding an Authorization Template to this Organization Role or choose ‘Save & New’ to link an other Template.
Only an Authorization Template can be linked to an Organization Role, not a Master Template.
A Master Template is only effective if an Authorization Template is set up for the same table and is linked to a User assigned Organization Role.
e.g. If an assigned Organization Role has an Authorization Template for table 91, the Master Template for table 91 is also effective.
When an action is triggered by a template on a user, these actions can be found on the user card under the fasttab “Processed Actions”.
Should a synchronization of this user show an ‘orange badge component’, this means one or more templates could not be processed correctly.
This will be visible too in the Processed Actions on that user card.
The synchronization process however, is not influenced by this warming.
In addition to the Error message, clicking on the “magnifying glass” of the faulty query, will also show what went wrong when executing that template.
¶ Execute in company
When a template is being made for a table which is not company specific, an option has to be chosen to specify in which company a query has to be executed.
The options are:
- From connection : the template will be applicable for the company of the database connection.
- Specific company : with this option, an additional field will appear to choose for which company the template applies.
- From organization role : the template will be applicable for the company chosen when the organization role is assigned.

¶ Overwrite manually set values
When setting up a template, there is an additional option called “Overwrite manually set values”.
Ticking this checkbox will modify the values which are set for every template that applies to the same table and to the Default values.
Activating this option will set the value of all the table fields to the values as set in the Authorization Box, with and without a template.
If values have been set in a template, the values mentioned in the template will be set in Business Central.
If values have not been set for a field in a template, the value of those fields will be set in Business Central according the Default values and overwrite any value already set in Business Central.
For instance, a value for a Job title has been manually set in Business Central :
-- When this option is checked, this field will be emptied (as per Default value) when there is no active template in the Authorization Box on how to fill this field.
-- when this option is not checked, the value in the field for the Job title in Business Central will remain as is.
¶ Default field values
Before setting up the templates, it is recommended to check the Default field values of the tables.
The list of tables in the Default values will be filled with tables for which a template was (or is) already active.
(go to : Authorization Framework=>Templates=>Default field values)
Here the Conflict Resolution can be set and if the field has to be ignored during the synchronization.
¶ Conflict Resolution :
The conflict resolution is used to determine which value has priority when multiple templates assign a different value to the same field.
Default is “High over low”, optionally you can choose for “Low over high”.
This option is only available for fields of type Boolean, Integer and Option.
.png)
Boolean : False=lowest value, True=highest value.
Option : the first option is the lowest value, the last option the highest value.
Example: template 1 assigns Boolean1 = ‘true’, template 2 assigns Boolean2 = ‘false’.
If priority is Lowest value (option “Low over high”), and a user has both templates assigned, the setting used will be ‘false’.
Ignore during sync :
In case there is a field that never has to be changed by the Authorization Box, the toggle “Ignore during sync” can be set to “on” for that field in the Default values.
This will only be effective in case the option of “Overwrite manually set values” has been chosen.
.png)
¶ Approval Templates
Linking Approval Templates to an Organization Role, determines which limits apply for sales, purchase and request amounts.
Also the approver and substitute for that Template can be assigned.
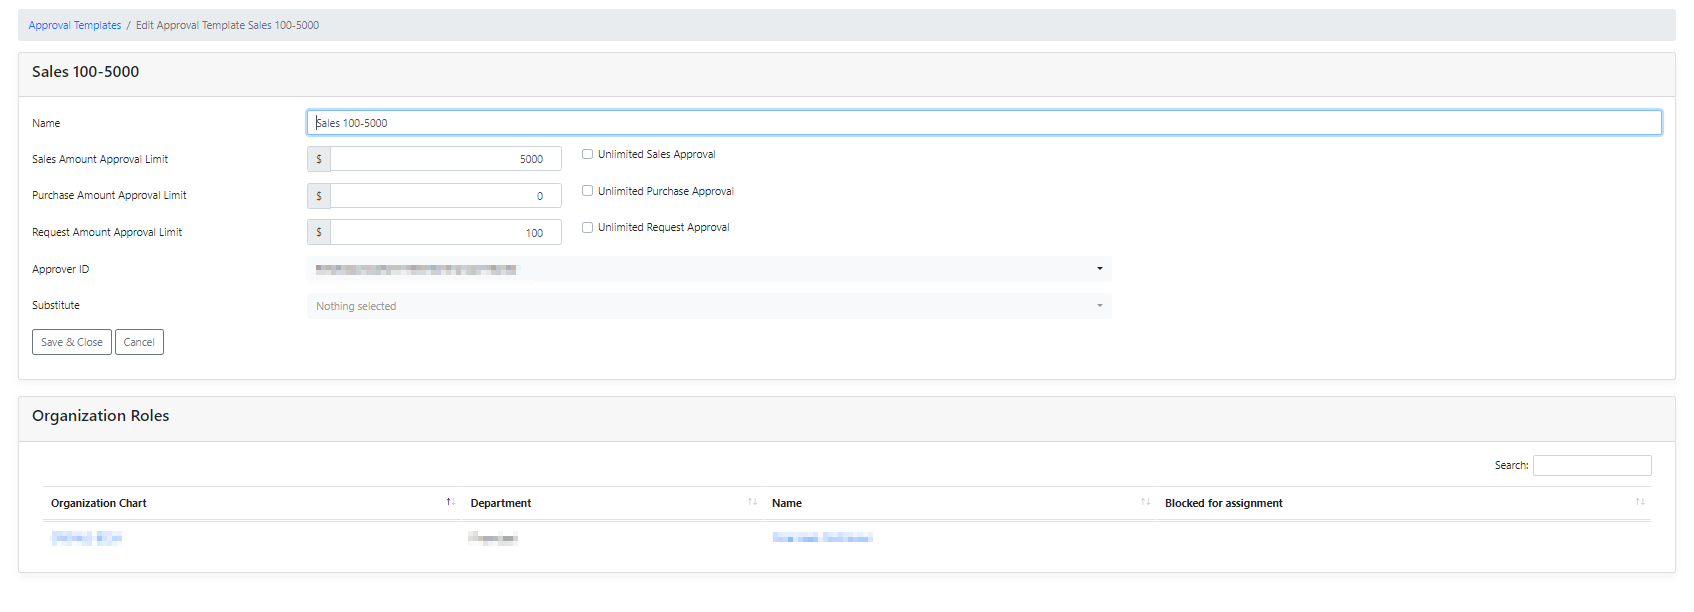
Go to Authorization Framework => Templates => Approval Templates and click on 'New'.
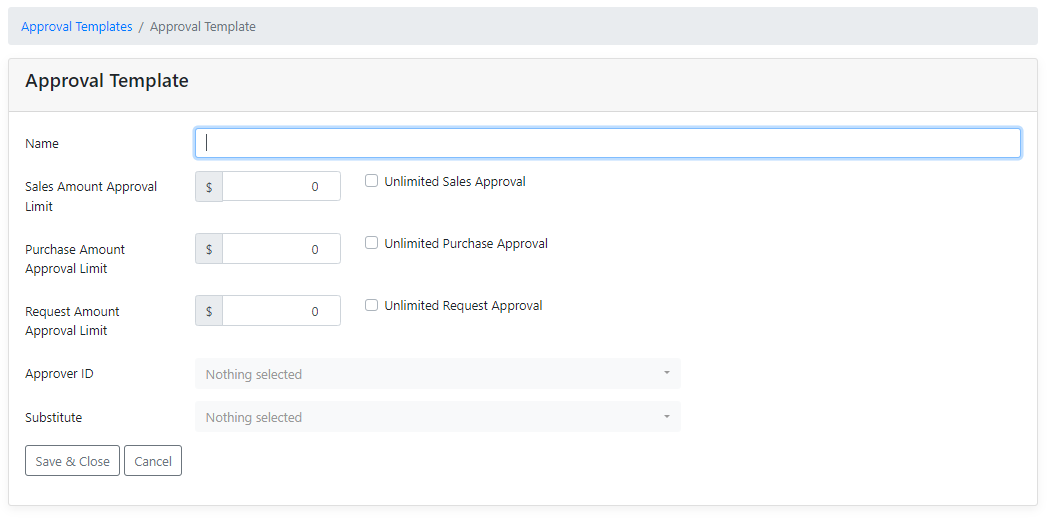
Name : Enter the name of the Template.
Sales Amount Approval Limit : Set the sales amount approval limit or set unlimited sales approval (checkbox).
Purchase Amount Approval Limit : Set the purchase amount approval limit or set unlimited purchase approval (checkbox).
Request Amount Approval Limit : Set the request amount approval limit or set unlimited request approval (checkbox).
Approver ID : Enter the main approver.
Substitute : Enter the substitute for the main approver.
‘Save & Close’ : Saves the Approval Template and closes the page.
‘Cancel’ : Cancels adding the Approval Template.
After the template is saved, it can be added to an Organization role by opening the Organization role and selecting the template in the header.

Should a user have multiple organization roles with Approval Templates assigned, the template with the highest value will be applied in a request.
When the Approver and the Substitute are left empty in the Approval Template, the already existing Approver and Substitute in Business Central will not be cleared/removed by this template.
An already assigned Approver and/or Substitute can only be replaced. To remove them they would have to be removed in Business Central.
The fasttab “Organization Roles”, on the page of the Approval Template, shows which organization role is assigned that template .
¶ Add a User level Approval Template to overrule the Approval Template on Organization Role level.
It is possible to overrule the approval settings through an Organization role with an an Approval Template for a User on user level.
In an Authorization Request, select an Approval Template in the header. This Template overrules the Approval Templates that are assigned to a User on an Organization Role level.
This way, a temporary User like for instance an intern, can be assigned the same Organization Roles as for a regular User, but with an Approval Template for a different (usually lower) approval amount.

¶ Free Fields
Free Fields are used to define own fields. These fields can be used within the Master and Authorization Templates to fill records in Business Central with user data.
To setup Free Fields go to: Authorization Framework => Templates => Free Fields.
There are two types of Free Fields.
- User Free Fields : Visible on the User Card.
- Organization Role Free Fields : Visible on the Organization Role.
The setup of these two types of Free Fields are both the same.
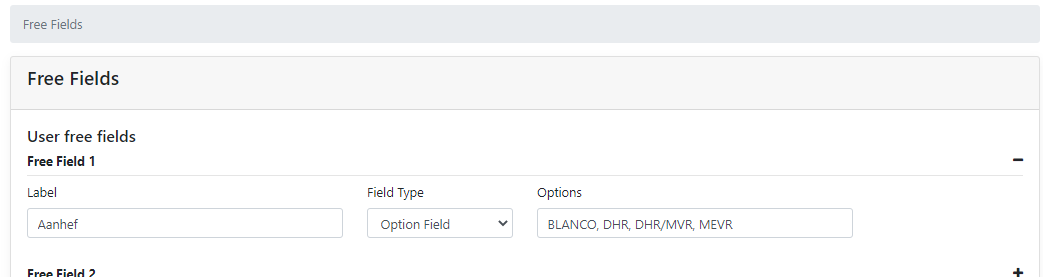
Label : The description of the free field.
Field Type : Type of field to be used. Options to choose between are; Text, Integer, Decimal, Date, Boolean and Option Field.
For the types Text, Integer and Decimal the Max Input Length can be set.
For the Option Field the options can be entered, separated by a comma.
The default values of Free Fields on Organization Roles can easily be filled using the backup functionality.
Use the option via the organization chart to export the structure, and with the "Import Users per Organization Role” option, the default settings for Free Field values on Organization Roles are automatically used for new or already assigned Organization Roles per User.
When adding an Organization Role to a User through an Authorization Request, only the Free Fields which are required (entered as a default value on that Organization Role) are shown in the request.
Free Fields of an Organization Role can also be added with the Authorization Request API.
The backup also supports the “Use Business Central table to select data” fields to make it easier to use the backup to restore the complete Free Fields setup to another environment.
¶ Fasttab Processed Actions in User card
On the User card, the fasttab “Processed Actions” shows all the actions that have been executed through Templates.
Clicking on the magnifying glass in that line, shows the query which was executed with that template.

Or, when an error occurs on a synchronization task because of a query, this fasttab shows why that query was unsuccessful, as the column “Error Text” will describe why the query was not executed.
¶ Include Field in Insert Query
When the Template Processor creates a new record, first the record will be inserted with only the key fields and secondly the record will be updated to set the values of the other fields. In some cases, it is required to add an extra field to the insert query. For instance, when a trigger validates a certain field when a record is inserted. In this case, you can use the "Include field in Insert Query" option to add a non-key field to the insert query. This will prevent the query from failing because of the check performed by the database trigger.
¶ Pre and Post actions
Pre and Post actions make it possible to process a specific action before or after the allocation of an Organization Role to a user.
A Post and Pre Action does not have to be linked to an Organization Role.
Go to Authorization Framework => Templates => Pre and Post Actions and click on 'New'.
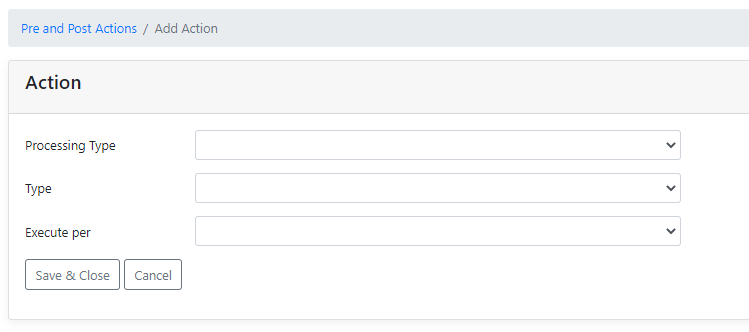
Processing Type : Choose when the action needs to take place;
- Pre Action : Action(s) of the template will be processed before allocation of an organization role to a user.
- Post Action : Action(s) of the template will be processed after allocation of the last organization role to a user.
Type : Choose the type of action;
- Batch : Choose the object type. (The type of action you want to run (report, codeunit and XMLport))
- Template : Fill in the following fields :
- Authorization Template : Choose the Authorization Template.
- Action on Grant : The action the Template needs to execute when granting the Organization Role to a user (No Action or Insert/Change).
- Action on Revoke : The action the Template needs to execute when revoking the Organization Role from a user (No Action, Change Record or Delete Record).
Execute per : Choose for which company the Post or Pre action is to be executed :
- All companies
- Company organization role
- Specific company / company group
'Save & Close' : Saves the action and closes the screen. The action is now effective.
‘Cancel’ : Cancels adding the action.